I was running out of space on drive C, on my Vista 64-bit PC. Luckily hard drives are cheap, so I purchased a 1TB drive and then contemplated how to transfer the system. I have a slightly complex setup, with 3 physical drives installed and four versions of Windows (XP, XP64, Vista 32 and Vista 64) – Vista 64 is the one I use most of the time, but I find the others useful for testing or running otherwise incompatible software. Virtual machines are good for this too, but there is still a place for real installs
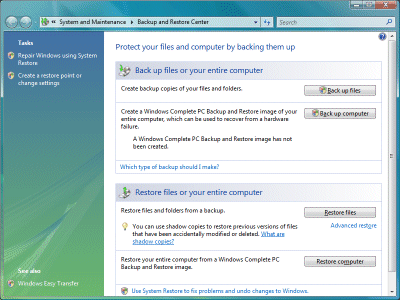
Last time I did this, on a laptop, I used an excellent tool called Drive Snapshot. It worked well; but I figured this was a good opportunity to test the backup and restore built into Windows. In effect, I would do a backup, then pretend my drive had failed and restore to a new one. I attached an external USB drive, opened Windows Backup and selected Create a Windows Complete PC Backup and Restore image of your entire computer, which can be used to recover from a hardware failure.
It started badly. As I mentioned, I was running out of space:
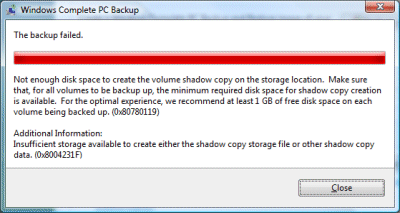
The backup failed: not enough disk space to create the volume shadow copy on the storage location.
I had a plan. Windows automatically creates a file called hiberfil.sys, which is roughly the same size as the amount of RAM in the system. Removing hiberfil.sys is easy, and frees up plenty of space. Just open a command prompt with administrator permissions and type:
powercfg.exe –h off
You can guess how to re-enable it later. I retried the backup and it worked. Next, I removed the old hard drive – my insurance policy – and attached the new one.
A little-known fact, which many people discover in bad circumstances: restore is harder than backup. This was no exception. I was expecting to boot from the Vista setup DVD, choose a restore option, and have my system back as it was. I was also hoping that I’d be able to resize the partitions, otherwise I’d be no better off than before, but if necessary that could be tackled later.
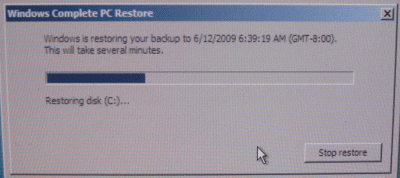
It didn’t go well. I booted from the Vista setup DVD, and clicked through several repair options selecting to use Windows Complete PC Restore. I arrived at this dialog (with apologies for the quality; it’s a photo of the screen):
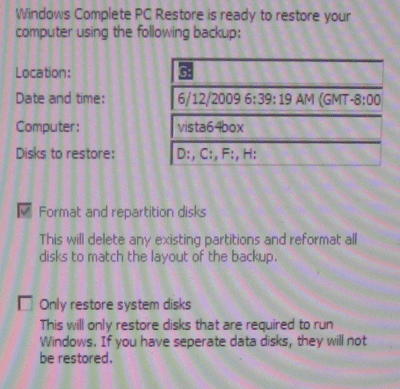
The dialog says: This will delete any existing partitions and reformat all disks to match the layout of the backup. Yes, I had four partitions to restore. Still, this dialog caused me some anxiety. There were other physical disks in the machine, which I had not backed up recently; would Vista also format and re-partition these? I thought probably not; but to be on the safe side I powered down, disconnected the other drives, and started again. I then confidently clicked Finish.
Unfortunately I got this notorious dialog:
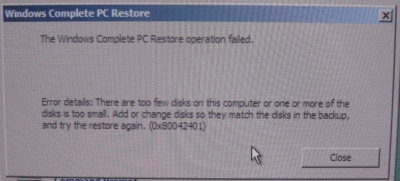
There are too few disks on this computer or one or more of the disks is too small. Add or change disks so they match the disks in the backup, and try the restore again.
Do you ever want to argue with your computer? I’d removed a 180GB drive, and replaced it with a 1TB drive, but Vista was insisting that it was too small.
Time to Bing, or should that be Google? I found this discussion, headed discouragingly A Windows Complete PC Restore always fails.
Luckily there were some tips in the thread, though not from Microsoft (a fact that has not gone unnoticed) even though this is an official forum. I rebooted and selected Command Prompt from the System Recovery Options. Then I ran diskpart, a command line tool which makes no pretence to user friendliness. I created four partitions, each bigger than the ones I was restoring. I tried to assign the correct drive letters, but the tool would not let me, advising me to check the system event log for more information. In the recovery environment? Thanks.
I tried again, but it still failed. Then I rebooted, just in case. This time it worked. Why? I’m not sure what was the key. It appears that the restore does not like to see a raw drive; yet as I discovered, it re-partitions it anyway. So I can’t give any definitive solution here, except to say, try fiddling with diskpart.
I went away for a few hours, and when I returned the restore was complete, the PC had restarted, and it was waiting for me to log in.
There was one snag. Rather than using the partitions I had created, the restore made its own, of the same size as on the old drive. Fortunately – and I’m not sure if this was accident or design – the partition I cared about was at the end of the drive, followed by free space. Unfortunately, the Extend Volume option in Disk Management was disabled and greyed out. Unfortunately again, the equivalent option in diskpart also failed. Whatever size I selected, I got The volume size you have selected is too large for the disk. Either select a disk with more free space, or specify a smaller volume. More lies. My drives are set to Basic; I guess that changing them to Dynamic might fix this.
I’m slightly distrustful of Dynamic drives, so I booted into a different version of Windows located on a different drive (I said this could be useful). This time, diskpart was happy to extend the volume. I then also typed extend filesystem. It worked:
Overall, I’m glad that the process worked, but not impressed with the fragility of the restore process and the lack of help with these puzzling error messages. I suppose Microsoft considers this an advanced task undertaken by professionals, who know how to Bing. I don’t see why the emergency restore should not be able to prepare a new hard drive, restore to it, and even offer to resize the partitions in a sensible manner.
I’d be interested to know whether Windows 7 handles this better, but not interested enough to try it.
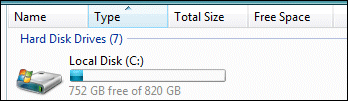
Fortunately, I’ll never again need to do this. I mean, 750GB free is enough for anyone, right?
Interesting article Tim – I enjoyed reading it. Can’t wait for the next installment when that 750GB is full though 😉 – it’s the modern equivalent of Parkinson’s law (http://en.wikipedia.org/wiki/Parkinson%27s_law)
As an aside to the main thrust of this blog entry; I’ve never spoken to anybody who uses Vista 64 as a matter of course. I have a copy and a license for it, and have been thinking of installing it. What’s your experience of it so far?
@Clyde Vista 64 is great, especially if you have plenty of RAM – I use 8GB. Much faster than Vista 32 on this particular box.
Tim
Did you have much in the way of driver problems?
No driver problems at all so far.
Tim
Hello,
I have come to the conclusion (many years ago) that Microsoft or rather Microsuck! truly sucks at both their installers as well as their feeble attempts at providing any sort of backup/recovery software. I thought that perhaps they had redeemed themselves upon seeing the new system restore tools provided on Vista Ultimate. I too was running out of space on my C drive and decided to install a 500GB drive and do a system restore to that drive. Well it went off without a hitch and booted correctly and all seemed well, however Microsuck in their infinite stupidity only made it an 80GB drive, just like the original. It has been my experience that when it comes to installers and backup solutions Linux has them beat. I am going to try a program that is based upon a Linux live CD called Clonezilla I have not used this before but will in the next few days and I will let you know how it works for me.
Robert
Hello all I am back,
After doing some more Googling I found a simple fix to my problem of only having 80GB usable on a new 500GB disk after doing a complete system restore from a back up image created by Vista’s restore utilities. Here is what you need to do.
If your restore went smoothly like mind did and you have rebooted back into Vista then open up your Control Panel and select “Administrative Tools” then select “Computer Management” a window that looks similar to Windows Explorer should open.
in the left hand window you should see the following categories “System Tools” “Storage” and “Services and Applications” Select “Storage” and then “Disk Management (local)” the utility will then scan your system for all installed Hard drives. In my system my new drive showed up as Disk 2 and showed the 80GB as the active partition on the disk and then it showed the remaining ~400GB as unallocated space. What most will want is for the entire disk to be used as the new C drive. This is what you need to do next.
Right click on the active section labeled as the C drive and select “Extend Volume” in the next screen that pops up you will be able to select the rest of the drive to become a part of the C drive.
I had no difficulties doing this and in less than a couple of seconds my C drive now was 465.76GB instead of only being 80GB.
I still feel that this should be handled automatically by the back up utility but is not.
Good luck
Robert
Hi Robert.
I have an old Gateway GM5424 running Vista Pro.
I started to get a warning that my hard drive was going to meet its maker. So I bought a new seagate SATA750 and put it in. Very easy to that point.
I was able to back up all my files and docs to a Maxtor 350 external hard drive. Then I went and fired up the computer with the new 750 hard drive.
I did the mirror back up as you describe. It went kinda OK with the same glitches you described in your prior article. Before the mirroring, I had the full new drive 750 GB, afterwards, it reverted all back to only 290 GB. I did all I could, defragged, cursed and prayed but could not find the missing 350 GB. Thank goodness, after doing several searches on google I found Tims Tec Blog @ http://www.itwriting.com/blog/1513-moving-vista-to-a-larger-hard-drive-using-built-in-backup-and-restore.html
At the end I found the article 16 Aug 09 by Robert “Hello I am back”. Followed it all and did what was written: Hey presto, I have back my 750 GB. Thanks to your article all’s now well.
David B.