Tag Archives: raspberry pi

Raspberry Pi does Audio at the Wigwam HiFi Show 2016

The Wigwam Hifi Show is an unusual event, in that most of the exhibitors are not vendors with their latest and shiniest, but enthusiasts showing off their own systems. It is a lot of fun, with plenty of exotic and/or old equipment that you will not see or hear elsewhere.

image

I have exhibited at the show in the past, and try to do something a little different each time. This year I thought it would be interesting to contrast the many multi-box and expensive systems with something at the other end of the scale. I was impressed when I reviewed the IQAudio Pi-DigiAMP+ for issue 36 of the MagPi magazine, so I took it along.

This unit is a board that plugs in on top of the main Raspberry Pi board.

image

It is very simple, the only external connectors being power in, and left and right speaker terminals. It includes a DAC and a class D amplifier, based on the Texas Instruments (TI) TAS5756m chipset. The DAC is based on a Burr-Brown design.

I assembled my unit using a Raspberry Pi 2, the above board, and the matching case and power supply from IQ Audio. The power supply is the XP Power VEF50US15 which means I get up to 2x20w; if you use a VEF65US19 you can get 2x35w (both available from the IQAudio site).

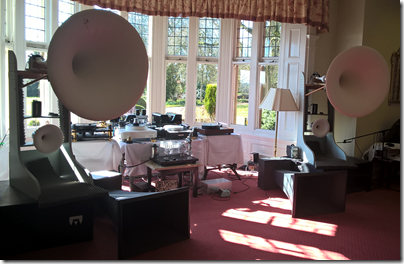
Here it is in the room at Scalford Hall, home of the Wigwam event.

image

The speakers shown are the Cambridge Audio Aero 6, though we also had a pair of Quad 11L and tried them both.

The way things work at this event is that you sleep in your room the night before, and the next morning the bed is removed and it becomes your exhibition room. Having tried the system with the bed in place, I was distressed to find it sounding markedly worse (bloated bass) once the bed was removed. With no time for proper experimentation we dragged the mattress back out of the cupboard and leant it against the wall, which improved matters; we also used foam bungs in the speaker ports to tame the bass. Not ideal, but shows the difficulty of getting good sound at short notice in small hotel rooms.

The Cambridge Audio Aero 6 speakers I would describe as a good budget choice; they sell for around £350. Philosophically (as with the Quads) they are designed to be clean, detailed and uncoloured. The choice of floorstanders rather than small standmounts was deliberate, as I wanted to demonstrate that using a tiny amplifier does not necessarily mean a small sound.

Having said that, we also put the Quads on from time to time, which are small standmounts. The sound was not radically different, though bass extension is less and to my ears the 11Ls are a little less precise than the Aeros, with a warmer sound. I preferred the Aeros but as ever with loudspeakers, tastes vary.

The complete parts list as shown:

  • Raspberry Pi 2 £26.00
  • IQAudio Pi-DigiAMP+ £57.99
  • IQAudio Pi-CASE+ £15.60
  • 15v Power Brick XP Power VEF50US15 £25.50

If I were buying today, I would recommend the new Raspberry Pi 3 and the more powerful 19v power supply which increases the cost by about £10.00.

So that is between £125 and £135 for the complete device, and then whatever you choose for the speakers.

For the demonstration I brought along a router with wi-fi, to which I attached a hard drive with lots of FLAC files ripped from CD, along with a few high-res files. The router lets you attach a USB drive and share it over the network, so I configured Volumio on the Pi to use that as its source. In a typical home setup, you would probably store your music on a NAS device and use your existing home network.

Where’s the amplifier?

There was a steady stream of visitors from around 10.00am to the close of the show at around 17.00. The goal was not to be the best sound at the show, but rather to be the smallest and still deliver decent sound quality, and for many visitors I think we succeeded. We stuck the equipment list on the wall and lots of people photographed it with the intention of looking into it further.

image
A demo under way: spot the mattress leaning against the wall and the smaller Quad speakers alongside the Cambridge Audios.

A number of visitors knew of, or were even using, a Pi for streaming, but the idea of having the amplifier included on a small board was less familiar; it was fun when people asked where the amplifier was, or whether the speakers were active (they are not). Some were really astonished that you can get respectable sound quality from such a small box.

Volume was more than sufficient for a room this size and frankly plenty for most home situations though of course not for huge rooms or loud parties.

Note that despite playing loud throughout the day the amp board did not get warm at all; this is because a Class D design delivers almost all the power supplied as output to the loudspeakers.

A few early comments from the forums:

“The super small Raspberry Pi based system by onlyconnect was a brilliant demo of what can be achieved by something tiny and low cost.”

“I wouldn’t have thought it possible if I hadn’t have heard it… To boot, completely taking price out of the equation, it was one of the better sounding systems at the show to my ears, I enjoyed that more than some far, far more expensive rigs.”

“Highlights. Onlyconnect’s raspi based system, honestly why pay more for music around the house?”

“Onlyconnect’s Raspberry system was impressive and wins the GVFM award.”

“Onlyconnect’s mini/budget system – just amazing how good a £125 raspberry pi setup containing streamer, dac, preamp and 35w per channel amp could sound. I can’t forget how flabbergasted another listener was to discover the total system cost  -” I’ve obviously doing it all wrong all these years”

“I spent a while looking for the amplifier, following the cables etc like everybody else. I was impressed by the sound coming out of the Cambridge Audio speakers, I would certainly put this in the top 40% of rooms based on the sound quality, maybe higher.”
Playing native DSD with Raspberry Pi 2 and Volumio

There are many intriguing debates within the world of audio, and one which has long interested me concerns DSD (Direct Stream Digital). This is an alternative technology for converting and recovering sound from digital storage. The more common PCM (Pulse Code Modulation) works by sampling sound at very short intervals and recording its volume. By contrast DSD records the difference between one sample and the next, sampling at an even greater frequency to compensate for the fact that it only captures a single bit of data in each sample (ie on or off). For example the standard used by CD is:

16-bit precision, 44.1 kHz sampling rate

and by SACD (a DSD format):

1-bit precision, 2.8224 MHz sampling rate

The SACD was introduced by Philips and Sony in 1999 as an upgrade to CD, since it is a higher resolution format cable of a dynamic range of 120 dB and frequency response up to 100 kHz. It was an effort, like the PCM-based DVD Audio, to convince the public that the CD is not good enough for the best quality sound.

SACD was largely unsuccessful, mainly because there was not really any dissatisfaction with CD quality among the general public, and even some experts argue that CD quality already exceeds what is required to be good enough for human hearing.

That said, SACD was popular in the niche audiophile community , more so than DVD Audio. Some listeners feel that SACD and DSD results in a more natural sound, and believe that PCM has some inherent harshness, even at higher-than-CD resolution. Enthusiasts say that DSD stands for “Doesn’t sound digital”. For this reason, there is a regular stream of new SACD releases even today, and DSD downloads are also available from sites like Native DSD Music and Blue Coast Records. Some DSD downloads are at higher resolution than SACD – Double-rate or Quad-Rate.

The resurgence of DSD has been accompanied by increasing availability of DSD DACs (Digital to Analogue Converters). While these tend to be more expensive than PCM-only DACs, prices have come down and a quick eBay search will find one from under £100.

There are several complications in the DSD vs PCM debate. While DSD is a reasonable format for storing digital audio, it is poor for processing audio, so many SACDs or DSD downloads have been converted to and from PCM at some point in their production history. If PCM really introduces harshness, it is presumably too late by the time it gets to DSD. That said, it is possible to find some examples that are captured straight to DSD; this can work well for live recording.

Another complication is that some consumer audio equipment converts DSD to PCM internally, to enable features like bass management.

Is there any value in pure DSD? I wanted to try it, preferably with DSD files rather than simply with SACD, since this is much easier for experimenting with different formats and conversions as well as enabling Double DSD and higher. Unfortunately SACD is rather hard to rip, though there is a way if you have the right early model of Sony PlayStation 3.

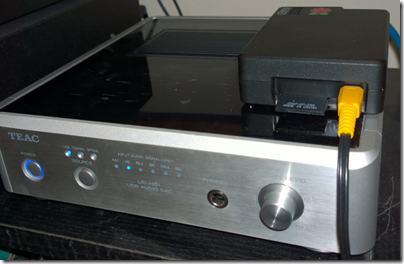
The first step was to get a DSD-capable DAC. I picked the Teac 301 which is a high quality design at a reasonable price. But how to get DSD to the DAC? Most DSD DACs support a feature called DSD over PCM (DoP), which conveys the DSD signal in a PCM-format wrapper. DoP is not a conversion to and from PCM, it merely looks like PCM for better compatibility with existing playback software.

Next, I used a Raspberry Pi 2 supplied by Element14 (cost around £25.00) and installed Volumio, a pre-built version of Linux which includes an audio streamer and web-based user interface. You download Volumio as a single file which you burn onto a micro SD card using a utility such as Win32DiskImager. Then you plug the card into the Pi, connect to a home network via Ethernet and to a DAC via USB, and power on.

After a minute or two I could connect to Volumio using a web browser.

image

My music is stored mostly in FLAC format but with a few DSD files in Sony’s DSF (Digital Storage Facility) format, and located on a Synology NAS (Network Attached Storage). In Volumio’s menu I went to Library and mounted the network share containing the media. Next, I tried to play some music. PCM worked, but not DSD. I changed the playback settings to enable DoP:

image

Success: My DSD files play perfectly:

image

If you squint at this image you will see that the 5.6 MHz light is illuminated, indicating that the DAC is processing Double DSD.

It sounds lovely, but is it any better than the more convenient PCM format? I am sceptical, but intend to try some experiments, using a forthcoming audio show to find some willing listeners.

That aside, I am impressed with the capability of the Raspberry Pi for enabling a simple and cost-effective means of playing DSD over the network, although with the assistance of an external DAC. It plays PCM formats too of course, and with Volumio is easily controlled using a mobile device, thanks to the touch-friendly web UI.

Do you need the new Raspberry Pi B+?

An updated Raspberry Pi board was released earlier this month, and the kind folk at Element 14 sent me one to review.

image

The Raspberry Pi is a complete low-power computer which needs only a case, an SD card, and a standard USB power source to start doing real work. It is ideal for learning projects, home automation, practical applications like running a media server or client, or anything you can think of.

It is a little over two years since the first Pi was shipped in April 2012. The progress is a little confusing: the first model was the B, followed by the A in early 2013, a cut-down model with a single USB port and no Ethernet.

image

The new model has the same Broadcom BCM2835 SoC as all the other Pi models. The CPU is a 700 MHz ARM 1176JZ-F.

So what is new? The highlights:

  • 4 USB 2.0 ports
  • The dedicated composite video port has been removed and is now shared with the audio jack, requiring an adaptor
  • The power draw is now 600 mA up to 1.8A at 5v, making it both lower power and higher power (when necessary) than the model B (750 mA up to 1.2A at 5v). The USB ports can supply a little more power, making most self-powered external hard drives usable, for example.
  • The SD card slot has been replaced by a micro SD card slot, a good move (all my SD cards are in fact micro SD cards with adaptors, which is common).
  • The GPIO (General Purpose Input Output) connector now has 40 pins rather than 26. The first 26 pins are the same as before, for compatibility.
  • The price is the same as for the B

There are a few other changes which I noticed. One is that the LEDs have been moved. On the B, there are 5 LEDs which are together on the bottom right corner of the board: ACT (SD card access), PWR, FDX (Duplex LAN), LNK (Activity LAN) and 100 (100Mbit LAN connected). The B+ has two LEDs in the opposite corner, ACT and PWR, and two more LEDs on the LAN port itself. Personally I prefer the old arrangement.

The audio output is improved, according to Pi inventor Eben Upton, thanks to a “dedicated low-noise power supply.” Raspberry Pi Engineer jdb adds that  “The output impedance and buffering for the audio port has been improved and the maximum output amplitude has been increased (~1.25V pk-pk).” However one blogger measured the output and considered no better (or slightly worse).

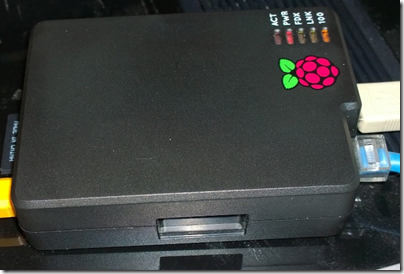
Since the layout of the board has changed, a B+ Pi will not fit in your old model B case. I bought a new case but I don’t recommend this one:

image

This is a push-fit case and even thought the board is held down by tabs, it moves and rattles slightly. I also worry about the case tabs breaking if you open it repeatedly. The tab that you need to press to open the case is sited by the micro SD slot, and that is another mistake, since it presses against the board making it hard to reopen after the Pi is fitted. There is also too much space below card slot so you can easily post your card into the case rather than into the slot if you are careless. Finally, I don’t like the way the top of the case slopes down, reducing the space above the GPIO at its shallow point.

I wish I had seen this Cyntech case which looks miles better, for a similar low price, though I haven’t actually tried it. I do like the idea of an optional spacer which lets you increase the case height to fit add-on boards.

Finally, a few notes on operation. If you have existing micro SD cards running on the B, they might or might not work on the B+. I use piCorePlayer as a streaming audio client, for which it is excellent, but my existing image would not boot on the B+.  Following a tip elsewhere, I installed the latest piCorePlayer download on the B, updated it to version 1.16A using the web UI, and it then worked on the B+.

image

I had no such problems with the standard Raspbian distro which worked fine on the B+.

image

So do you need the B+? If you have not yet tried a Pi, give it a try, it is fabulous. If you already have a B, then you will find some nice improvements but nothing dramatic – though the extra USB ports in particular are most welcome.

More information is on the Element14 site or of course the official site.

Hope for Squeezebox as Raspberry Pi becomes a streaming player

Now that Logitech has near-abandoned the Squeezebox (the one remaining player is the UE Smart Radio, and even that is not quite a Squeezebox client unless you download different firmware), existing users may be concerned for the future of the system.

Squeezebox consists of free server software which runs on a PC or NAS (Network Attached Storage) device, while the players are supplied by Logitech and controlled by a web app or smartphone/tablet app. Although more fiddly to set up than rivals like Sonos, Squeezebox is a strong choice for multi-room audio at a modest choice, and its community has come up with solutions such as support for high-resolution audio.

The latest community innovation is a project to make a Raspberry Pi into a Squeezebox client. piCorePlayer is delivered as an image file which you can write to an SD card. Pop the card into a Raspberry Pi, supply power, and it is ready to go – meaning that you need no longer worry about getting hold of a Squeezebox player.

image

The OS is the MicroCore version of Tiny Core Linux, and the player is Triode’s Squeezelite.

I gave this a try. It was almost very easy: my Pi booted successfully from the piCorePlayer image and was immediately recognised by my Logitech Media Server. The player supports output to the built-in audio jack, or HDMI, or a USB DAC, or an add-on DAC for the Raspberry Pi called HifiBerry.

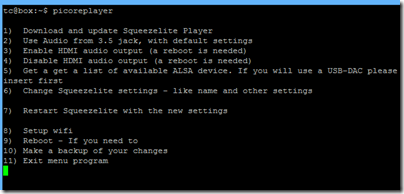
I am using a USB DAC (Teac UD-H01) which requires a little extra configuration. I logged in to the piCorePlayer using Putty, and typed picoreplayer to display the configuration menu:

image

Configuring a USB DAC is a matter of getting a list of available ALSA devices and setting the output accordingly.

It worked, but oddly I found that FLAC in 16/44.1 format played with crackling and distortion. 24-bit files played perfectly.

image

The only solution I have found (though it sounds counter-intuitive) is to force output to 16-bit by adding –a 40::16 to the Squeezelite arguments. Everything now plays nicely, though limited to 16-bit – you are unlikely to notice much difference but it is a compromise.

If you try piCorePlayer, here are a few tips.

Log in with user: tc pwd: nosoup4u

The Squeezelite executable is stored at:

/mnt/mmcblk0p2/tce

and the settings scripts are in

/usr/local/sbin/settings_menu.sh

If you need to edit the configuration without the script, you can use vi, which is the only pre-installed editor I have found. Quick start with vi:

  • Type i to enter edit mode
  • Press ESC to enter command mode
  • Quit without saving by typing :q!
  • Save and quit by typing :wq

There are plenty of vi tutorials out there if you need to know more!

Finally, note that this version of Linux runs in RAM. If you make changes they will not persist unless you create a “backup” with

/usr/bin/filetool.sh –b

This is also an option in the picoreplayer menu, and must be used if you want your changes to survive.

Expanding the Raspberry Pi with PiFace and Pi Rack

The marvellous Raspberry Pi, essentially a cheap, small PC, is a great device for education or home projects like media streaming. Out of the box though, it is not ideal for controlling other devices other than by USB or ethernet. What if you wanted to to use it to operate a switch under program control? You can use the GPIO (General Purpose IO) header, but it is a considerable step up in terms of the electronics knowledge needed for success (and to avoid damaging your Pi).

Element14 has an answer to this in the form of the PiFace, which connects to the GPIO header and provides a range of inputs and outputs. To be precise:

  • 2 changeover relays. These switch a link between a central common pin and two other pins.
  • 8 open-collector outputs. You can use these as switches for an externally powered device.
  • 8 digital inputs. These detect whether a contact is open or closed.
  • 4 switches. These close the first four inputs when depressed.

Element14 kindly supplied a PiFace to me for review, along with another accessory, the Pi Rack, of which more in a moment.

The PiFace comes in a small cardboard box with a regulatory compliance leaflet and no other documentation.

image

Here is a closer view:

image

You can see the inputs at bottom left, the outputs at top right, and the relays on the right. The following diagram from the Element14 site shows the details:

image

The PiFace fits on top of the Raspberry Pi. A rubber foot on the underside rests on the HDMI port relieving the strain on the GPIO connector. If you have a standard size Raspberry Pi case, it will no longer fit once the PiFace is attached, though you can still use the base of the case as I did for my tests. Note that by default the PiFace takes power from the Pi, though this has implications for the power supply you use, which must be 850-1400 mA for the model B Pi.

image

On the software side, installation is either by downloading a pre-built Raspbian image with the software already in place, or by modifying your existing installation. I am using the soft-float Debian Wheezy build and chose the latter route. It is not difficult; just enable the SPI (Serial Peripheral Interface) driver by removing it from the modprobe blacklist, run an install script, and reboot. The scripts come from a github repository here.

The PiFace software includes a nice emulator which lets you operate the switches. I am not sure that emulator is quite the right description because it really does operate the switches.

image

Being more of a software person than an electronics engineer, I set myself a simple task: to operate a light switch under program control. I used a child’s electronics kit to provide the light. First I tried using the relay, which was very simple: it is just a switch. Next I used one of the open-collector outputs which also worked once I had found out that the negative connection from my external 3V power supply connects to GND on the PiFace. Here is my light in action:

image

Note the LED is lit on the output terminal indicating that the switch is ON. Rather than the external supply, I could have taken 5v from the PiFace. A very simple test, but if you can switch a bulb on and off you can switch any number of other things as well, provided the voltage is not too great. Above 5v requires changing some jumper settings and even the relays should not be used for voltages over 20v or currents greater than 5A.

What about programmatic control? Libraries are supplied for Python, C and Scratch (a visual programming language primarily for education). I adapted the example Python script as follows:

from time import sleep
import piface.pfio as pfio
pfio.init()

while (not pfio.digital_read(1)):
if (pfio.digital_read(0)):
  pfio.digital_write(2,1)
else:
  pfio.digital_write(2,0)
sleep(1)

print "Bye"

This script loops until you depress (or otherwise close) the second physical switch or input on the PiFace. It reads the value of the first input, and if it is ON it turns on the output which lights the bulb. Rather pointless, but shows how easy it is to turn a physical device on and off under program control, and to respond to the value on an input.

I like the PiFace though it is in competition with the slightly more expensive Gertboard which has a motor controller, Digital to analogue and analogue to digital converters, and an on-board programmable MCU (Microcontroller). You might not need those features though, making PiFace a better choice.

A snag with the PiFace is that it uses the GPIO port and therefore prevents you using that port for anything else. In order to fix this and to increase the expandability of the Raspberry Pi, Element14 also supply the Pi Rack. This is a simple affair that give you four connections to the GPIO port. You can use this to operate more than one PiFace (each must have a different jumper-set address) or to use other GPIO devices such as the Pi Camera Module. The Pi Rack has its own 5v power input though no power supply comes in the box. Jumpers let you select which power supply to use on a connector-by-connector basis, and to swap the SPI CE (chip enable) lines if needed.

image

Here is the Pi Rack in use with a PiFace. In practice you would want additional support for the PiFace rather than just relying on the connector.

image

Currently the PiFace Digital is £20.30 and the Pi Rack £6.99.

Building a cheap PC, and why it still beats tablets and laptops for value

I thought the Google Nexus tablet was good value, and compared to an Apple iPad or most other tablets out there it is, but for sheer capability on a budget a desktop PC has it beat.

Needing a cheap desktop I went along to Ebuyer and purchased the following:

  • Asus P8H61-MX SI Motherboard bundled with Intel Pentium G620 and 2GB DD3 RAM
  • Extra Value Micro ATX case with 500w PSU (unbranded)
  • Additional 2GB RAM

The total cost was £128.54 with free delivery. I then plucked a Sata DVD drive and a 200GB hard drive from a dead server, and put it all together, which took less than an hour. Next installed Windows 7 64-bit, for which fortunately I have a subscription license. Plugged in spare keyboard, mouse and monitor.

image

I was impressed by the Windows Experience Index of 4.9, and Gaming graphics of 5.6 achieved by Intel’s integrated graphics. The board has VGA and DVI ports and supports dual displays. It also has HD audio and of course ethernet networking.

image

What would it cost if I had not had spare DVD and hard drives? A 500GB drive is £42.70 and a DVD drive £11.94 currently, making £183.18, or £152.65 without the VAT.

Need Windows? You are a system builder, so you can get Windows Home Premium with SP1 64-bit for £75.99, or Professional for £104.98. Total cost with the cheaper option is £259.17, now more than a Google Nexus tablet (£159.00 for the 8GB version).

Add a screen, keyboard and mouse for £65.97 (BenQ LCD 18.5” 1366 x 768), and the complete system is £325.14, or £249.15 if you stick Ubuntu on in place of Windows 7.

Still, I’d bet that the average household has at least some reusable bits lying around.

The real point is how capable even a budget box like this turns out to be. The RAM is upgradeable to 16GB.

The dark side to all this is that the value of your old PC has plummeted since you bought it three or four years ago, and faults beyond the trivial are hardly worth repairing.

Finally, I should mention Raspberry Pi. The board complete with CPU, networking and graphics is £25.92. Add case, 4GB storage, power, keyboard, mouse, and HDMI monitor though, and my quick price for the complete system is £147.81, mostly for the monitor (Benq 21.5” HDMI). Of course there are many creative uses for a Raspberry Pi without buying a monitor.

My vote still goes to the PC for the best productivity on a budget.

PS let’s not forget the cheapest Mac, currently a Mac mini at £529. OS comes with it, but only 2GB RAM, no mouse, keyboard or monitor. Add those and it is over £600.