Category Archives: audio

The MQA enigma: audio breakthrough or another false dawn?

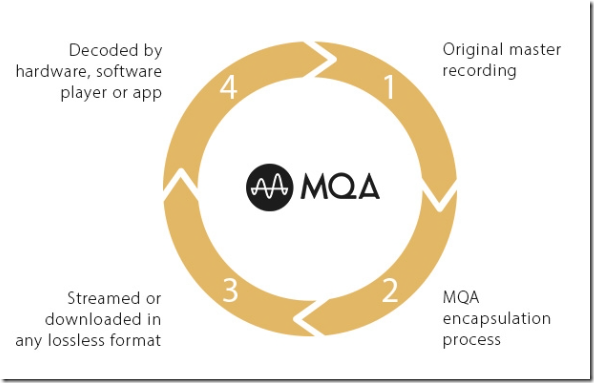
The big news in the audio world currently, announced at CES in Las Vegas, is that music streaming service Tidal has signed up to use MQA (Master Quality Authenticated), under the brand name Tidal Masters. MQA is a technology developed by Bob Stuart of Meridian Audio, based in Cambridge in the UK, though MQA seems to have its own identity despite sharing the same address as Meridian.

image

What is MQA? The question is easy but the answer is not. Here is the official short description:

Conventional audio formats discard parts of the sound to keep file size down, but part of this lost detail is the subtle timing information that allows us to build a realistic 3D soundscape in our minds. … With MQA, we go all the way back to the original master recording and capture the missing timing detail. We then use advanced digital processing to deliver it in a form that’s small enough to download or stream.

At first sight it looks like another format for lossless audio, and the description on MQA’s site confuses matters by making a comparison with MP3:

MP3 brings you just 10% of what was recorded in the studio. Everything else is lost to fit the music into a conveniently small file. MQA brings you the missing 90%.

There are two problems with this statement. One is that MP3 (or its successor AAC) actually sounds very close to the original, such that in tests most cannot tell the difference; and the other is that audiophiles tend not to use MP3 anyway, preferring formats like FLAC or ALAC (Apple’s version) which are lossless.

There is more to it than that though. There are three core aspects to MQA:

1. “Audio origami”: MQA achieves higher resolution than CD (16-bit/44.1MHz) by storing extra information in audio files that is otherwise wasted, as it stores audio that is below the noise floor (ie normally inaudible). There is a bit of double-think here as removing unnecessary parts of audio files is the sort of thing that MP3 and AAC do, which the MQA folk have told us is bad because we are not getting 100%.

This is also similar in concept to HDCD (High Definition Compatible Digital), a technology developed by Pacific Microsonics in the Eighties and acquired by Microsoft. Of course MQA says its technology is quite different!

Note that you need an MQA decoder to benefit from this extra resolution, and there is a nagging worry that without it the music will actually sound worse (HDCD has the same issue).

2. Authentication. MQA verifies that the digital stream is not tampered with, for example by audio features that convert or enhance the sound with digital processing. This can be an issue particularly with PCs or Macs where the built-in audio processing will do this by default, unless configured otherwise.

3. Audio “de-blurring”. According to MQA’s team:

There’s a problem with digital – it’s called blurring. Unlike analogue transmission, digital is non-degrading. So we don’t have pops and crackles, but we do have another problem – pre- and post-ringing. When a sound is processed back and forth through a digital converter the time resolution is impaired – causing ‘ringing’ before and after the event. This blurs the sound so we can’t tell exactly where it is in 3D space. MQA reduces this ringing by over 10 times compared to a 24/192 recording.

If this is an issue, it is not a well-known one, at least, not outside the niche of audiophiles and hi-fi vendors who historically have come up with all sorts of theories about improving audio which do not always stand up to scientific scrutiny.

So is MQA solving a non-problem? That’s certainly possible; but I do find it interesting that MQA has received a generally warm reception from listeners.

Here’s one audiophile’s reaction:

Have never really “done” digital before. 16/44 has always sounded ghastly to my ears right from the start and still now. MQA did indeed “fix” the various forms of distortion that I could hear present in everything where the sampling rate was taken down to just 44. … My findings – those of an improved sense of solidity in the stereo image and the lack of that horrendous crystalline glassy edge to things, especially on the fade, seem to be being mirrored in what people are hearing. It doesn’t have that thing I describe as a “choppy sense of truncation” which I suspect others mean by “transients”.
Basically, per the post above, it’s a bit like “good analogue”. Digital can finally hold its head up high against an analog from master-to vinyl performance. And not only that, hopefully, walk all over it and give us something genuinely new.

If this history of audio has shown us anything, it is that subjective judgements about what makes something sound better (and whether it is better) are desperately unreliable. Further, it is often hard to make true comparisons because to do requires so much careful preparation: identical source material, exactly matched volume, and the ability to switch between sources without knowing which is which, to avoid our clever brains from intervening and telling us we are hearing differences which our ears alone cannot detect.

We should be sceptical then; and even possibly depressed at the prospect of a proprietary format spoiling the freedom we have enjoyed since the removal of DRM from most downloadable audio files.

Still … is it possible that MQA has come up with a technology that really does make digital audio better? Of course we should allow for that possibility too.

I have signed up for Tidal’s trial and will report back shortly.

Ripping vinyl with the Plato home entertainment system

I am a tad conflicted when it comes to vinyl records. On the one hand, I have not seen convincing scientific evidence, or a properly conducted blind test, that demonstrates any reason why record replay is superior to digital, while there is plenty of evidence for the reverse. On the other hand, I put on a well-mastered record, and it is like magic, I am transported into the music in a way that my digital sources rarely achieve. Plus the sleeves are beautiful, and in the case of older recordings, a sense that this is the real thing and subsequent formats mere copies (even if they do sound better). Finally, sometimes missing or damaged master tapes, or the bad habits of the recording industry in compressing CD audio so that it is uniformly LOUD, mean that records sometimes really do sound better, despite the limitations of the format.

If you like the sound of records but the convenience and security against damage that digital offers, you might want to rip them. I have done this but would not describe it as easy. You have to play the record in the closest to ideal conditions you can manage – clean record, no dust accumulated on the stylus, high quality turntable and phono stage – while also recording the output through an analogue to digital converter (ADC). Then when done, you have to break the result into separate tracks and tag it correctly. There is software to assist this whole process, like Channel D’s Pure Vinyl, but it is never that quick and easy. There is also the question of how much to tinker with the results in the hope of improving it, via click removal and the like. Personally I tend to the view that most things risk making the sound worse, but there is certainly a case for it, especially with particularly intrusive scratches.

Last week I went to a demo of Plato, a system for ripping vinyl combined with an all-in-one home media playback solution. It comes from the Derby-based company Convert Technologies, formerly known as Entotem. The company has also launched the Red Dot recording service, through which you can get them to rip vinyl or even CDs on your behalf.

image

The company showed me its top of the range unit, which is an all-in-one box for storing digital media as well as playing it, and includes a power amplifier which delivers, they say, 25W Class A amplification or 50W Class B. The idea of Class A/B amplification is not new so I am not sure whether there is any secret sauce in the Plato design; however the company also offers a Class B version at a considerably lower price.

The system runs Android customised for the purpose, with a touch screen. There is also a controller app which works best on Android but is also available for Apple iOS with “approx 70% of the functionality”. It includes an ESS Sabre 32 DAC and ADC. Inside is a beefy toroidal tranformer powering the various boards. Around the back is a generous set of inputs and outputs, including MM/MC phono input, 3 additional line inputs, 1 coax and 3 optical digital inputs, 2 optical digital outputs, 1 HDMI output, and 3 USB 2.0 ports.

The digital format can be set up to 24-bit/192 kHz.

image

You can pay extra for SSD storage which is pretty pointless from a technical point of view (SSD is much faster, but a conventional hard drive easily fast enough for audio recordign and playback) but would lower the noise level slightly, though the fan is likely to be louder in any case.

Having all the controls functions driven by software enables plenty of features. You can change the phono input from moving coil to moving magnet, vary the capacitance and resistance,  and apply a rumble filter, for example.

Ripping vinyl is a matter of pressing a red button (hence the name of the ripping service). When the audio is played, there is an analogue chain for listening, I was told, but also a “parallel digital path” which captures a sample of the audio and sends it to Gracenote, an online tagging service, for recognition. If you are lucky, you will get the metadata and album artwork automatically retrieved. The system will also separate the tracks for you, taking most of the drudgery out of the ripping process. 

The system does not attempt any click or noise reduction. “We have looked at it, because we write all the software, but most people said ‘don’t do it’,” said Pete Eason, Customer Experience Manager. “It’s not a priority”.

You can export the files to USB storage, so you could do your own additional processing if you wanted. However there is an annoyance: the agreement with Gracenote prohibits the export of the album art. So if you export your files for playback on a phone, for example, you don’t get the art. That’s irritating and there is talk of switching to another metadata supplier to fix it.

The system will stream music from attached USB storage, or over the network using UPnP. I am not a fan of UPnP because it seems less amenable to search, and less reliable, than other systems such as Logitech Media Server, but it should work OK. Internet radio is also provided, via the TuneIn service.

However you cannot access Plato’s storage directly over the network. This makes me wonder if Plato’s engineers would have been better off using Linux rather than Android for their embedded OS, as that would make this trivial to implement.

There is no support for Spotify Connect, which is a shame. You can of course stream to the unit from a phone or laptop using a device such as Google ChromeCast but that is not the same thing, since the quality and consistency of the signal is limited by your phone.

The Red Dot ripping service sounds good for those with plenty of money and little time, especially as it includes a cleaning service, but it is expensive at £10.00 per album and a minimum quantity of 25. Note you could buy the CD for less in many cases.

There is also a limitation in terms of the playback equipment used. It would be too expensive to use a true high-end cartridge and stylus. Red Dot uses “a really decent Pro-Ject Debut Carbon turntable and Ortofon stylus,” according to the FAQ, though they talked about other possible turntables, but always mid-range. That may not equal the equipment you have at home.

I got to ask some awkward questions. Why would anyone want to rip their vinyl, when with Spotify or Apple Music you could just play it from internet?

“There’s a quality issue there,” said marketing guy Ben Timberley. Eason added, “and also you can backup your vinyl. It’s always going to be a pristine original.”

Well, it will not always be a pristine original, but it will always be the same as when it was ripped.

I asked a hypothetical question. Let’s say I submit my rather beaten-up copy of David Bowie’s Ziggy Stardust, and as it happens Red Dot had just ripped someone else’s pristine copy of exactly the same album. Would they rip my scratched copy, or simply give me their existing rip? I would get my crackly one back, I was told. The other copy “belongs to someone else. We are sticking firmly on the side of the law on this one.”

I am not personally convinced that the law is so clear-cut. My records all say “unauthorised … copying of this record prohibited” and “all rights reserved”. On the one hand, there is the question of whether even personal format conversion of a record is strictly legal (though I cannot imagine anyone being pursued for it). On the other hand, since the record represents a personal license to enjoy that particular recording, I am not sure that whether you get back a copy of your record or someone else’s makes any difference.

Red Dot also offers to rip CDs, and here the argument seems even more ridiculous. Since ripping a CD with identical mastering results in an identical file, it would be absurd to re-rip when you already have the file in question. Are LPs any different, even though the imperfections of the format mean that every rip will vary slightly?

Next question: is there a paradox at the heart of this operation, which is that people who love records believe that the analogue chain sounds better than digital, so they are unlikely to want a digital copy? And if they do, why not just buy the digital version?

I got a somewhat garbled response. “That’s one argument but then this is essentially lossless, isn’t it?” said Eason. “You’re getting all the pops, the clicks, the whistles.”

“We’ve got the best DAC in the industry, which is the Sabre DAC,” added Timberley. “If you are going to convert it we’ve got the best piece of kit to do it.” Though I think he meant ADC rather than DAC.

I also suggested that retailers might prefer to buy their own Plato and offer a ripping service, rather than resell Red Dot. Dealers are “too busy” said Timberley, though they might look a a licensing restriction if it became an issue.

What I think

This is not a review and I have not had a chance to try this at home. If you seriously want to rip your vinyl (and I do think there could be good reasons, as I stated above, though hearing pristine pops and clicks is not one of them), then Plato looks like a convenient though expensive choice.

As an all-in-one hi-fi (just add speakers) Plato might also be good, though it looks expensive compared to, say, a NAS, a Raspberry Pi with a DAC, and a decent amplifier. It is hard to value these things without trying them out though.

In the end though, my instinct is that the best way to play records is to play records. I haven’t found record wear much of a problem, especially when you have a large collection.

So I am not sure that Plato is for me, though it does look nice and easy to use.

Table of recommended retail prices (including VAT)

  Vinyl ripping Phono Stage Pre Amp Power Amp
Class B
Power Amp
Class A
Price with
1TB HDD
Price with
2TB HDD
Price with
1TB SSD
Plato Lite Yes (with external
Phono stage)
No Yes No No £1899 £1999 £2539
Plato Pre Yes Yes Yes No No   £2400 £2940
Plato
Class B
Yes Yes Yes Yes No   £2999 £3539
Plato Class A Yes Yes Yes Yes Yes   £3999 £4539

Review: Libratone Zipp Mini

I am quite taken with this Libratone wireless speaker, though I had a few setup hassles. The device comes in a distinctive cylindrical box with a nightingale image on the top. Unpack it and you get a medium-size desktop (or table or shelf) speaker, around 22cm high, with a colourful cover that looks zipped on and a carry strap. There is also a power supply with UK and European adaptors, and a very brief instruction leaflet.

image

Plug in, and the device starts charging. The leaflet says to download the app (for iOS or Android) and “set up and play”. It was not quite so easy for me, using Android. The app is over-designed, by which I mean it looks great but does not always work intuitively. It did not find the speaker automatically, insisted that a wi-fi connection was better than Bluetooth, but gave me no help connecting.

After tinkering for a bit I went to the website and followed the steps for manual wi-fi setup. Essentially you temporarily disconnect https://www.itwriting.com/blog your normal Wi-fi connection, connect your wi-fi directly to the Zipp, go to 192.168.1.1 in the browser, select your home wi-fi network, enter the password, and you are done.

Everything worked perfectly after that. I fired up Spotify, played some music, selected the Zipp under Spotify Connect, and it sounded great. For some Android apps you may need a Bluetooth connection though, or you can use DLNA. The beauty of Spotify Connect is that the connection is direct https://www.itwriting.com/blog the speaker to the internet, it does not depend on the app running, so you can switch off your phone and it still plays. It is actually a better solution than Apple Airplay for internet streaming.

image
The Nightingale button

Control is either via the app, or through the Nightingale button on the top of the speaker. The button works really well. Tap to pause or resume. Slide finger clockwise or anti-clockwise for volume. Skip forward or back by tapping the right or left edge. Then there is a neat “hush” feature: place your hand over the button and it mutes temporarily.

A bit more about the sound. Although this is the smaller Zipp Mini, you can tell that Libratone has taken trouble to make it sound good, and it is impressively rich and full considering the size of the unit. You are getting your money’s worth, despite what seems a high price.

I spent some time comparing the Zipp with Squeezebox Radio, another (but sadly discontinued) wireless audio device I rate highly. Both are mono, both sound good. I did notice that the Zipp has deeper bass and a slightly softer more recessed treble. I cannot decide for sure which sounds better, but I am slightly inclined towards the Libratone, which is actually high praise.

One lovely feature of the Zipp is internet radio, which comes via Vtuner. This is hidden in the feature called Favourites. You select favourite radio stations in the app, with the default being BBC stations and Classic FM. You can change your favourites by tapping the Nightingale icon in the app (another hidden, over-designed feature) and tapping My Radio.

image

Once set up, tap the heart button on the Nightingale button on the device to switch to radio. Tap twice to skip to the next station. Internet radio does not depend on having the app running, it works directly https://www.itwriting.com/blog the Zipp.

The Zipp has a power button, press and hold to power on or off, tap to show remaining battery. It also has an aux jack socket, for wired playback https://www.itwriting.com/blog any source, and a USB socket which you can use either for charging a phone, or for playback https://www.itwriting.com/blog music files on USB storage (I did not try this, but a wide range of formats are supported, including MP3, WAV, FLAC, Ogg Vorbis, WMA, AAC, AIFF and ALAC). You can also use USB for wired playback https://www.itwriting.com/blog iOS, but not https://www.itwriting.com/blog other devices.

Apple Airplay is supported and worked great when I tried it with an iPad. One thing to note: there is currently no iPad app, so you have to search for the iPhone app, which does also work on the iPad.

This very flexible device also supports Bluetooth 4.1 and you can use it as a speaker phone, just tap the Nightingale button to answer a call, so yes it has a microphone too. It also supports DLNA which means you can “play to” the device on some applications, such as Windows Media Player.

If you have more than one Zipp you can connect them for multi-speaker playback. You can select Stereo if you have two speakers or more, but Libratone recommend something they call FullRoom, which means leave it to their digital signal processing (DSP).

Sadly I only have one Zipp, but there are a few options in the app to set DSP optimization for things like Outdoor, Shelf and Floor. I did not notice a huge difference.

You can get different colour covers, and I tried removing mine. It is a bit fiddly, and the current Zipp Mini does not quite match the explanation on the Libratone site. The handle on this Zipp does not come off; you unzip the cover, twist to disconnect the zip, then feed the handle through the hole. Not something you are likely to do often.

image
The device naked

Finally, if you are curious like me, here are some specifications:

  • Class D amplifier
  • 1 x 3” woofer, 1 x 1” tweeter 2 x 3.5” low frequency radiators
  • Frequency response 60-20,000 Hz (no dB range specified)
  • Maximum volume 96 dB SPL/1m
  • 2400 mAhs battery
  • Bluetooth 4.1
  • 10 hours of playback approx.

Conclusion? I really like the Zipp Mini. It sounds great, supports a wide range of standards, and works well for Internet radio. I like the appearance, the Nightingale button is elegant, and you can expand it with more speakers if needed. This or the larger Zipp model might be all the hi-fi you need.

Caveats: many of the features are a bit hidden, initial setup I found fiddly, the supplied instructions are hopelessly inadequate, and with all those choices it can get confusing.

No matter, it is a lovely device.

More information on the vendor’s site here.

Mo-Fi headphones from Blue: distinctive design delivers excellent sound

I attend several trade shows during the year, and at one of these Blue was showing off its microphones and headphones. These are the world’s best headphones, said one of the representatives. I expressed some scepticism and she promised to send me a pair to try.

image

The Mo-Fi, which sells for around £249 or $349, is an unusual set of wired headphones in that it includes its own amplifier, powered by a rechargeable 1020mAh battery. It takes 3-4 hours to charge, which gives you around 12 hours of play, though if the battery runs out it is not fatal as you can also use the headphones in passive mode.

The amplifier can also be used in “On+” mode which boosts the bass slightly. Despite this feature, these headphones are designed for those who like a natural sound rather than one which exaggerates the sonics for instant appeal but later fatigue.

First impressions

When you unpack the Mo-Fi headphones from their solid cuboid box you immediately get an impression of a well-built and high quality product. This is an over the ear design with a metal frame and what I would describe as a modernist, industrial look; opinions on this will vary but personally I am more interested in the sound and the comfort. If you are looking for a svelte and elegant headset though, these will not be for you.

image

In order to achieve a good fit whatever the size of your head, Blue has put hinges on the earcups so you can tilt them inwards, reducing their distance from the headband. You can also adjust the tension on the headband to get a looser or tighter grip according to taste. I find the comfort OK though not the best; the problem is that the solidity of the design means greater weight (455g) so you notice them a bit more than a lighter and softer set. That said, I can wear them for an hour or two without strain.

Blue supply two cables, a short 1.2 meter cable for iPad and iPhone which includes volume, pause and microphone, and a 3 meter cable for other sources. There is also an adaptor for headphone amplifiers with a 1/4” jack socket, and another for aeroplane seats with the old dual jack sockets. Finally, you get a well made soft case with a carry strap.

image

There is no mention of Android phones in the short manual, but the iPhone cable works fine for microphone and pause/play. The in-cable volume controls only with Apple devices though, because of annoyingly different hardware standards.

Sound quality

The philosophy behind the Mo-Fi seems to be that most of use compromise our listening experience by using headphones or headsets that do not do justice to the music. In part this is because of inferior headphone amplifiers in many mobile devices, which the Mo-Fi’s built-in amplifier mitigates though cannot fix completely (since it is not bypassed).

I tried the Mo-Fi on a variety of devices, including Android phones, an iPad, and an audiophile headphone amplifier (Graham Slee Solo). I compared them to several other headphones and headsets, using music including classical, jazz, rock and pop. I listened to the Mo-Fi mostly with its amplifier on, but not in the on+ position.

The good news: the sound is excellent. It is clean, precise, extended in frequency response, and generally neutral in tone though with slightly recessed high frequencies.

What is the effect of the built-in amplifier? It depends. Using the external headphone amplifier, the built-in amplifier does little more than increase the volume. You can get the same result by turning up the volume in passive mode. On a phone though, the effect is more marked, and you can hear improvement in quality as well as volume. That is what you would expect.

However, while the Mo-Fi sounds good with a phone, I was surprised how much much the sound improved when using the Graham Slee amplifier. Since a Solo costs more than the Mo-Fi, perhaps that is not surprising, but it does illustrate that unfortunately there are still compromises when using a smartphone for music.

What kind of sound do you get from the Mo-FI? Since it is neutral and clean, the Mo-Fi sounds good with all kinds of music, though they are not bright, to the extent that you should avoid them if you like a bright sound. The bass I found particularly tuneful, for example on My Funny Valentine by Miles Davis, which is a rare quality. Listening to the magical Four Seasons by the Academy of St Martin in the Fields I found the Mo-Fi smooth and engaging but not quite as clear or sweet as on high-end Sennheiser headphones.

Playing By Your Side by Sade, which has deep bass that is difficult to reproduce, the Mo-Fi coped well with all the bass energy, though losing the cymbals on this track sounded slightly muted.

Death of a Bachelor by Panic! at the Disco is always an interesting track to play, thanks to its ridiculous bass extension. The Sennheiser HD 600 (about the same price as the Mo-Fi though an open back design) sounds too polite on this track, failing to reproduce the bass thunder, but in compensation sounds tuneful and clean. The Mo-Fi makes more effort to reproduce the bass but on this very demanding track it does tend to blur (a rare failing with these cans) making the tune harder to follow.

On a modern recording of Beethoven’s 5th Symphony (San Francisco Symphony Orchestra conducted by Michael Tilson Thomas), the Mo-Fi does a fine job reproducing the scale and drama of the opening movement, no trace of blurring here. It is a big sound though again slightly let down by the treble.

No, these are not the best headphones in the world, but they do deliver outstanding quality at what, in audiophile terms, is a moderate cost.

If your preferences veer towards realistic bass and a big, articulate sound you will like the Mo-Fi. If you prefer a sweet, detailed treble with lots of air and space, these might not be for you.

There is one annoyance. One is that the amplifier switch is slightly crackly on my Mo-Fi. I worry that it might get worse over time.

Blue quotes a “15Hz-20kHz” frequency response for both the amplifier and the drivers, but without any indication of how much frequency drops off at the extremes so these figures are meaningless. Impedance is 42 ohms.

Summary

The sound quality is great, but the downside is that the Mo-Fi is relatively heavy and bulky and so some that will be a considerable disadvantage, especially as it does affect the wearing comfort. I can wear the HD 600 all day, whereas after a couple of hours I wanted to remove the Mo-Fi (it might become more comfortable as it wears). The closed back design means you get good sound isolation, which is good or bad depending on how much you want to be able to hear external sounds while listening to music.

If that doesn’t put you off, the Mo-Fi is well worth a listen. It’s well made, thoughtfully packaged, and sounds better than most of its competition.

Raspberry Pi does Audio at the Wigwam HiFi Show 2016

The Wigwam Hifi Show is an unusual event, in that most of the exhibitors are not vendors with their latest and shiniest, but enthusiasts showing off their own systems. It is a lot of fun, with plenty of exotic and/or old equipment that you will not see or hear elsewhere.

image

I have exhibited at the show in the past, and try to do something a little different each time. This year I thought it would be interesting to contrast the many multi-box and expensive systems with something at the other end of the scale. I was impressed when I reviewed the IQAudio Pi-DigiAMP+ for issue 36 of the MagPi magazine, so I took it along.

This unit is a board that plugs in on top of the main Raspberry Pi board.

image

It is very simple, the only external connectors being power in, and left and right speaker terminals. It includes a DAC and a class D amplifier, based on the Texas Instruments (TI) TAS5756m chipset. The DAC is based on a Burr-Brown design.

I assembled my unit using a Raspberry Pi 2, the above board, and the matching case and power supply from IQ Audio. The power supply is the XP Power VEF50US15 which means I get up to 2x20w; if you use a VEF65US19 you can get 2x35w (both available from the IQAudio site).

Here it is in the room at Scalford Hall, home of the Wigwam event.

image

The speakers shown are the Cambridge Audio Aero 6, though we also had a pair of Quad 11L and tried them both.

The way things work at this event is that you sleep in your room the night before, and the next morning the bed is removed and it becomes your exhibition room. Having tried the system with the bed in place, I was distressed to find it sounding markedly worse (bloated bass) once the bed was removed. With no time for proper experimentation we dragged the mattress back out of the cupboard and leant it against the wall, which improved matters; we also used foam bungs in the speaker ports to tame the bass. Not ideal, but shows the difficulty of getting good sound at short notice in small hotel rooms.

The Cambridge Audio Aero 6 speakers I would describe as a good budget choice; they sell for around £350. Philosophically (as with the Quads) they are designed to be clean, detailed and uncoloured. The choice of floorstanders rather than small standmounts was deliberate, as I wanted to demonstrate that using a tiny amplifier does not necessarily mean a small sound.

Having said that, we also put the Quads on from time to time, which are small standmounts. The sound was not radically different, though bass extension is less and to my ears the 11Ls are a little less precise than the Aeros, with a warmer sound. I preferred the Aeros but as ever with loudspeakers, tastes vary.

The complete parts list as shown:

  • Raspberry Pi 2 £26.00
  • IQAudio Pi-DigiAMP+ £57.99
  • IQAudio Pi-CASE+ £15.60
  • 15v Power Brick XP Power VEF50US15 £25.50

If I were buying today, I would recommend the new Raspberry Pi 3 and the more powerful 19v power supply which increases the cost by about £10.00.

So that is between £125 and £135 for the complete device, and then whatever you choose for the speakers.

For the demonstration I brought along a router with wi-fi, to which I attached a hard drive with lots of FLAC files ripped from CD, along with a few high-res files. The router lets you attach a USB drive and share it over the network, so I configured Volumio on the Pi to use that as its source. In a typical home setup, you would probably store your music on a NAS device and use your existing home network.

Where’s the amplifier?

There was a steady stream of visitors from around 10.00am to the close of the show at around 17.00. The goal was not to be the best sound at the show, but rather to be the smallest and still deliver decent sound quality, and for many visitors I think we succeeded. We stuck the equipment list on the wall and lots of people photographed it with the intention of looking into it further.

image
A demo under way: spot the mattress leaning against the wall and the smaller Quad speakers alongside the Cambridge Audios.

A number of visitors knew of, or were even using, a Pi for streaming, but the idea of having the amplifier included on a small board was less familiar; it was fun when people asked where the amplifier was, or whether the speakers were active (they are not). Some were really astonished that you can get respectable sound quality from such a small box.

Volume was more than sufficient for a room this size and frankly plenty for most home situations though of course not for huge rooms or loud parties.

Note that despite playing loud throughout the day the amp board did not get warm at all; this is because a Class D design delivers almost all the power supplied as output to the loudspeakers.

A few early comments from the forums:

“The super small Raspberry Pi based system by onlyconnect was a brilliant demo of what can be achieved by something tiny and low cost.”

“I wouldn’t have thought it possible if I hadn’t have heard it… To boot, completely taking price out of the equation, it was one of the better sounding systems at the show to my ears, I enjoyed that more than some far, far more expensive rigs.”

“Highlights. Onlyconnect’s raspi based system, honestly why pay more for music around the house?”

“Onlyconnect’s Raspberry system was impressive and wins the GVFM award.”

“Onlyconnect’s mini/budget system – just amazing how good a £125 raspberry pi setup containing streamer, dac, preamp and 35w per channel amp could sound. I can’t forget how flabbergasted another listener was to discover the total system cost  -” I’ve obviously doing it all wrong all these years”

“I spent a while looking for the amplifier, following the cables etc like everybody else. I was impressed by the sound coming out of the Cambridge Audio speakers, I would certainly put this in the top 40% of rooms based on the sound quality, maybe higher.”

Devialet’s Phantom audio system on show in Barcelona

I was glad to see and hear the French Devialet Phantom system at the Mobile Focus event in Barcelona, just before Mobile World Congress, having missed the company’s recent presentation in London.

image

The Phantom is a device that looks like a giant eyeball, and is essentially an active mono wireless DAC and speaker. There are two models, the Phantom which delivers up to 99dB at 1 metre and costs €1690, and the Silver Phantom which delivers up to 105 dB at 1 metre and costs €1990. There is an optional Dialog unit at €299 which is a wi-fi router that creates a private network for the Phantom as well as supporting a guest network designed for music sharing. A Dialog can also control up to 24 Phantoms and is necessary for multi-channel; obviously for stereo you need at least two. An app called Spark runs on iOS, Android or Windows (not Windows Phone) and handles playlists as well as visualising music.

Each Phantom has a midrange unit, a treble unit, and two woofers. It measures 253 x 255 x 343mm and weighs 11 kg.

My encounter with Phantom did not get off to a good start. I am allergic to misleading jargon, and the pitch the Davialet representative made to me was confusing to say the least. “Digital chops up the sound,” he told me; but with hybrid technology Devialet was able to reproduce the purity of analogue sound. I observed that every DAC in the world is able to decode digital formats to analogue sound, and we had some difficulty progressing to what exactly is different about Devialet’s approach.

The case for the Phantom is not helped by the over-the-top language in the brochure, which modestly claims “the best sound in the world” and under a heading “IN TECHNICAL TERMS” promises Zero distortion, Zero background noise and Zero  impedance.

The system was playing Hotel California by the Eagles when I was there. I know the sound of this album well and it sounded boomy and unpleasant, though it is difficult to get good sound on a stand in a busy exhibition so I make generous allowance for that.

I did get a copy of a white paper which offers a bit more information. There are several technologies involved.

The first is what Devialet called ADH (Analog/Digital Hybrid). This combines class A amplification with the efficiency of class D. The way Devialet puts it is that several class D amplifiers act as slaves to the class A amplifier, so that the class D amplifiers provide the power while the class A amplifer the control.

A Texas Instruments PCM179x DAC is positioned next to the amplifier to minimise any loss between the two.

Next comes SAM (Speaker Active Matching) which processes the audio to compensate for the characteristics of the drive units. This “takes place ahead of the DAC and power amplifier section” according to the paper, so you could think of it as a kind of digital pre-amplifier. SAM has “a mathematical model of the complete drive unit, accounting for the electrical, mechanical and acoustical behaviour.”

image

A third feature has the name HBI (Heart Bass Implosion). This tackles the tricky problem of reproducing deep bass with a small enclosure. The idea is to use a sealed box design for high efficiency at the lowest frequencies, a driver with long 26mm excursion (the difference between the foremost and backmost position of the driver) in order to move more air, and to use two symmetric drivers to cancel mechanical vibrations.

This does result in high maximum air pressure inside the enclosure, up to 174dB SPL according to Devialet’s paper. Most drivers collapsed in this environment, so Devialiet designed its own woofer.

Finally Devialet’s engineers figured that a sphere is the ideal shape for producing sound without “diffraction loss”.

The result, according to the specs, is 16Hz to 25kHz +- 2dB, and 20Hz to 20kHz +- 0.5dB which is impressive for a speaker system.

The problem with such measurements is that they typically taken in an anechoic chamber whereas actual listening rooms have all sorts of resonances that result in a much less accurate sound.

Does Devialet’s Phantom system sound as good as a more traditional system at its price level? That is the question which interests me; if I get an opportunity to try it out I will be sure to report back.

Playing native DSD with Raspberry Pi 2 and Volumio

There are many intriguing debates within the world of audio, and one which has long interested me concerns DSD (Direct Stream Digital). This is an alternative technology for converting and recovering sound from digital storage. The more common PCM (Pulse Code Modulation) works by sampling sound at very short intervals and recording its volume. By contrast DSD records the difference between one sample and the next, sampling at an even greater frequency to compensate for the fact that it only captures a single bit of data in each sample (ie on or off). For example the standard used by CD is:

16-bit precision, 44.1 kHz sampling rate

and by SACD (a DSD format):

1-bit precision, 2.8224 MHz sampling rate

The SACD was introduced by Philips and Sony in 1999 as an upgrade to CD, since it is a higher resolution format cable of a dynamic range of 120 dB and frequency response up to 100 kHz. It was an effort, like the PCM-based DVD Audio, to convince the public that the CD is not good enough for the best quality sound.

SACD was largely unsuccessful, mainly because there was not really any dissatisfaction with CD quality among the general public, and even some experts argue that CD quality already exceeds what is required to be good enough for human hearing.

That said, SACD was popular in the niche audiophile community , more so than DVD Audio. Some listeners feel that SACD and DSD results in a more natural sound, and believe that PCM has some inherent harshness, even at higher-than-CD resolution. Enthusiasts say that DSD stands for “Doesn’t sound digital”. For this reason, there is a regular stream of new SACD releases even today, and DSD downloads are also available from sites like Native DSD Music and Blue Coast Records. Some DSD downloads are at higher resolution than SACD – Double-rate or Quad-Rate.

The resurgence of DSD has been accompanied by increasing availability of DSD DACs (Digital to Analogue Converters). While these tend to be more expensive than PCM-only DACs, prices have come down and a quick eBay search will find one from under £100.

There are several complications in the DSD vs PCM debate. While DSD is a reasonable format for storing digital audio, it is poor for processing audio, so many SACDs or DSD downloads have been converted to and from PCM at some point in their production history. If PCM really introduces harshness, it is presumably too late by the time it gets to DSD. That said, it is possible to find some examples that are captured straight to DSD; this can work well for live recording.

Another complication is that some consumer audio equipment converts DSD to PCM internally, to enable features like bass management.

Is there any value in pure DSD? I wanted to try it, preferably with DSD files rather than simply with SACD, since this is much easier for experimenting with different formats and conversions as well as enabling Double DSD and higher. Unfortunately SACD is rather hard to rip, though there is a way if you have the right early model of Sony PlayStation 3.

The first step was to get a DSD-capable DAC. I picked the Teac 301 which is a high quality design at a reasonable price. But how to get DSD to the DAC? Most DSD DACs support a feature called DSD over PCM (DoP), which conveys the DSD signal in a PCM-format wrapper. DoP is not a conversion to and from PCM, it merely looks like PCM for better compatibility with existing playback software.

Next, I used a Raspberry Pi 2 supplied by Element14 (cost around £25.00) and installed Volumio, a pre-built version of Linux which includes an audio streamer and web-based user interface. You download Volumio as a single file which you burn onto a micro SD card using a utility such as Win32DiskImager. Then you plug the card into the Pi, connect to a home network via Ethernet and to a DAC via USB, and power on.

After a minute or two I could connect to Volumio using a web browser.

image

My music is stored mostly in FLAC format but with a few DSD files in Sony’s DSF (Digital Storage Facility) format, and located on a Synology NAS (Network Attached Storage). In Volumio’s menu I went to Library and mounted the network share containing the media. Next, I tried to play some music. PCM worked, but not DSD. I changed the playback settings to enable DoP:

image

Success: My DSD files play perfectly:

image

If you squint at this image you will see that the 5.6 MHz light is illuminated, indicating that the DAC is processing Double DSD.

It sounds lovely, but is it any better than the more convenient PCM format? I am sceptical, but intend to try some experiments, using a forthcoming audio show to find some willing listeners.

That aside, I am impressed with the capability of the Raspberry Pi for enabling a simple and cost-effective means of playing DSD over the network, although with the assistance of an external DAC. It plays PCM formats too of course, and with Volumio is easily controlled using a mobile device, thanks to the touch-friendly web UI.

Review: Synology DS415+ Network Attached Storage

Synology’s DS415+ is a NAS (Network Attached Storage) device aimed at small businesses or demanding home users. I have been running this on my own network for the last 6 weeks or so.

image

First, a note about Synology’s product range. Let us say you want a NAS with 4 drive bays. Here are the choices, with current bare NAS prices from Amazon.co.uk:

  • DS414j £252.63: Budget offering, 512MB RAM, 1.2 GHz  dual core ARM CPU, 1 USB 2.0, 1 USB 3.0, 1 1GB Ethernet port. 90W power supply, 32.64W power consumption.
  • DS414 Slim £237.87: Smaller case designed for 2.5″ drives. All the other units here support 3.5″ drives. Given that you can normally tuck your NAS away in a corner, there is limited value in restricting yourself to these smaller drives, but there is also an energy as well as space saving. 512MB RAM, 1.2GHz single core ARM CPU, 2 USB 3.0 ports, 2 1Gb Ethernet ports. 30W power supply, 15.48W power consumption.
  • DS414 £332.83: Core product. 1GB RAM, 1.33 GHz dual core ARM CPU, 1 USB 2.0, 2 USB 3.0, 2 1Gb Ethernet ports, 90W power supply, 28.42W power consumption.
  • DS415 Play £379.99: Home oriented. Benefits from hardware video transcoding. 1GB RAM, 1.6GHz dual core Intel Atom CPU, 3 USB 2.0 ports, 2 USB 3.0 ports, 1 1Gb Ethernet port, 90W power supply, 27.33W power consumption.
  • DS415+ £460.74: Business oriented. 2GB RAM, 2.4GHz quad core Intel Atom CPU, 1 USB 2.0 port, 2 USB 3.0 ports, 1 eSATA port, 2 1Gb Ethernet ports, 100W power supply, 32.64W power consumption.

You can get a more detailed comparison of these four models in this table. Incidentally, I am guessing that in the Synology numbering scheme, the first digit represents the number of drive bays, and the second two digits the year of release.

The 415 models are the latest releases then, and the only ones to use Intel CPUs. The extra cost of the 415+ buys you double the amount of RAM, a quad core CPU, and an eSATA port.

The software is mostly the same on all the devices, Synology’s Diskstation Manager (DSM), currently at version 5.1. It looks as if some limits are lifted with the 415+, for example there is support for 256 iSCSI LUNs on the 415+, versus 10 on the 415 Play. The 415+ also has specifica support for VMWare VAAI (vStorage API for Array Integration) and Windows Server ODX (Offloaded Data Transfer); this enables some storage tasks to be offloaded to the storage system for better performance on the virtualization host.

Why buy a unit like this when you could simply get a server with plenty of drive bays, or with hardware RAID, and install Linux or Windows Storage Server? The two reasons are first, simplicity of operation, and second, low power consumption.

The distinction is not as sharp as it first appears, since a Synology device like this is in fact a server. If you require maximum flexibility and do not care about energy use, a generic server is probably better. If you require only simple network attached storage, such as a large shared folder on the network, a unit like the 415+ is overkill; just get a DS414j or some other brand. On the other hand, if you expect to install and use several apps, the extra for a DS415+ buys you a substantially more capable server.

Another way of looking at this is that the processing power in the DS415+, while still modest compared to a modern desktop PC, is sufficient for some real work, such as running web applications or even a media server with software transcoding.

Setup

image

Unpack the box, and you find the NAS unit, power supply and a couple of ethernet cables. Unclip the front cover and you can see the four drive bays, with caddies which can easily be removed for drive installation.

image

The drive caddies are screwless for 3.5″ drives; just remove the side panels, insert the drive, and replace the side panels to secure.

image

You can also install 2.5″ drives with four screws through holes in the caddy base.

At the rear of the unit, there are dual fans, two Ethernet ports, 2 USB 3.0 ports, eSata port, and the power connector.

image

I fitted four 3TB Western Digital Red drives – currently £89.36 on Amazon – attached the device to the network and powered up. You can than access the NAS management UI with any web browser. Normally, entering diskstation:5000 will find it. The initial setup downloads and installs the latest version of DSM, and offers an instant configuration which is a single large network folder backed by Synology Hybrid RAID (SHR).

image

I accepted this just to try it, and then blew it away in favour of a more flexible configuration.

Diskstation Manager

Synology DSM is a version of Linux. You can access the OS via SSH, or use the browser-based GUI. The GUI is rather well done, and presents a desktop-like environment with a windowing system.

image

The button at top right open a kind of Start menu:

image

Applications are installed and removed through the Package Center:

image

Generally, you should use only the Package Center to manage applications, though terminal access can be useful for troubleshooting, cleanup, or tweaking settings if you know what you are doing.

Since packages are only available from Synology, you are limited to those applications which are supported, unless you do a manual install:

image

Even a manual install has to be in the Synology package format (an archive with appropriate metadata). Some packages, such as the Plex media server, are available for download as manual installs, though may need tweaking to install correctly.

Third party developers can create packages, free or paid, and submit them to Synology for approval.

If an application is updated, it can take a while before the Synology package is updated. This could be a problem if, for example, a critical security bug is found in an application running on a Synology device exposed to the internet. There are not a huge number of packages available. I counted 63 in the DS415+ Package Center. However, this does include everything you need for a basic business server, including a mail server, DNS Server, LDAP Directory Server, Drupal CMS, SugarCRM, web server with PHP and MySQL, Tomcat application server, and more.

On the multimedia side, there are applications for serving audio and video, a DLNA media server, and Logitech Media Server (also known as Squeezebox Server).

There are several backup applications, including one for Amazon’s Glacier service (low-cost cloud storage).

Storage management

The primary role of a Synology device is for storage of course, and this is configured through the Storage Manager. Configuration begins with Disk Groups, which represent one or more physical drives in a RAID configuration.

image

There are several supported RAID configurations:

SHR: Synology Hybrid RAID with 1- or 2- disk fault tolerance. You need at least 4 drives for 2-disk tolerance.

RAID 0: disk striping, no fault tolerance

RAID 1: drive mirroring

RAID 5: 1-disk fault tolerance

RAID 6: 2-disk fault tolerance

RAID 10: RAID 0 across mirrored drives, 1-disk fault tolerance with high performance.

What is SHR? There is an explanation here. The high-level story is that SHR is more efficient with drives of varying capacity, and more flexible when adding new drives. It is not proprietary and apparently data can be recovered if necessary by mounting SHR drives in a Linux PC (provided no more than one drive has failed).

You set the RAID level when you create a disk group. Once you have a disk group, you can create volumes or iSCSI targets on that group.

I was interested in trying iSCSI. I have a desktop PC that is running out of space. I created a 1500GB iSCSI target and mounted it on the PC using the iSCSI initiator in Control Panel. It worked perfectly, and a new drive appeared in Disk Management.

image

Is this sensible, or should you just use a network folder which is more flexible, since it is shared storage? An iSCSI target behaves like a local drive, which can be an advantage, but iSCSI is mostly used for servers where centralising storage is convenient. You should also use a dedicated network for iSCSI, so it is probably not a great idea for a desktop PC.

I compared performance. On simple tests, such as time taken to copy a file, there was little advantage; in fact, my iSCSI drive was slightly slower: 61.2 MB/s vs 76.4 MB/s for a shared folder.

I tried ODX, copying a file from one iSCSI drive to another. Capturing the copy thermometer was a challenge, as it was near-instant:

image

In general, I have been very happy with the performance of the NAS.

Folder permissions

My local network uses Active Directory (AD), so I was keen to set up permissions on the NAS using AD. Connecting a Linux server to AD can be a problem, and at first the Synology would not play. I connected it, seemingly successfully, but it would not see any users. There are threads on the Synology forums showing users with similar problems. The fix for me was to enter my Domain Controllers as IP numbers rather then FQDNs (fully qualified domain names). Since then it has worked perfectly, though DSM shows the Domain Server Type as “NT4 Domain”, puzzling when my DCs are on Server 2012 R2.

Once connected, you can set folder permissions using the Synology File Station package. First, create the shared folder, then right-click the folder and choose Permissions.

image

Apps and Applications

Aside from the storage services, the main application I run on the Synology is Logitech Media Server (LMS). This used to run on a Windows server, and actually runs much better on the Synology. Search is quicker, the server is more responsive, and it is more reliable.

I tried the Synology audio and video applications, and the media server. There are various companion mobile apps, such as DS Audio and DS Video, for media playback.

image

The apps I tried worked well for me, though I am sticking with LMS for home music streaming.

Final words

I have no complaints about the DS415+, which has performed well so far. Browsing through the user forums though, I have noticed some areas of difficulty. One is that the Cloud Station service, which synchs files between your NAS, computers and mobile devices, is notorious for consuming disk space. Users find their drives filling up even though the total size of their files is much less than the available space. Currently, the best advice seems to be not to use Cloud Station.

The general issue with a system like this is that the friendly GUI is great while everything is working, but if something goes wrong and you have to dive into Linux, the ease of use disappears. That is worth noting if you plan to use this as the main server in a small business (beyond storage), unless someone there has the necessary troubleshooting skills.

The device does tick a lot of boxes though: resilient storage, excellent performance, low power consumption, flexible configuration, AD integration, and enough power to run something like Logitech Media Server without blinking.

Recommended.


A nearly perfect boombox: take your audio on the road with TDK’s Trek Max

I first heard the Trek Max at a busy press exhibition; audio rarely sounds good in big noisy rooms but I was struck by the fact that this TDK device was not dreadful but made a valiant attempt to deliver the music: there was at least a little bass, there was volume, there was clarity, and this from a small box, 24 x 5 x 10cm to be precise.

image

I asked for one on loan to review and it has not disappointed. There is not much in the box, just the Bluetooth speaker, a power supply/charger, and some mostly useless bits of paper.

image

The hardest task was getting that sticker off the front without leaving a gooey mark. Having done that to the best of my ability, I charged the unit, and paired with a phone. My attempt to use NFC (one-touch Bluetooth connect) failed with a Windows Phone, but worked with an Android tablet. It is no big deal; pairing is straightforward with or without NFC.

Then I played some music. I put on Santana Abraxas; this thing boogies, and does a great job with the complex percussion and propulsive guitar. I played Adele’s 21; it sounds like Adele singing, not the squawky sound you might expect from a device this size, and the drums on Don’t You Remember have a satisfying thud. I played Beethoven’s Third Symphony; the drama and power of the opening movement came over convincingly, albeit in miniature form.

I am not going to pretend that this is the best Bluetooth speaker I have heard; it has tough competition at much higher prices. I do not judge a thing like this versus a home audio setup or a larger Bluetooth speaker that is only semi-portable. This is something to take with you, and even sports a “weatherized” case; the manual makes clear that it is “splash-resistant” rather than anything more serious, and then only if you make sure to close the rubber flap over the panel on the right-hand side, but still a handy feature.

Any clever tricks? Just a couple. One is that you can use the Trek Max as a battery charger for your mobile phone (or any device compatible with USB power). Here is that side panel in detail:

image

From right to left, there is the USB power output (it has no other function), an AUX in for a wired audio connection, power in, and a master power switch which turns the entire unit off (including the USB power output).

The other party trick is the ability to work as a speakerphone. You are grooving along to music from your mobile, and an incoming call comes in. The music stops and a call button on the top illuminates. Press to answer, take the call hands-free, and press twice to end it. Neat.

image

Note that the Trek Max is surprisingly heavy for its size, around 1.25Kg. It does not surprise me; there is a lot packed in, including a decent battery.

The speaker configuration is right, left, central woofer for the (mono-ed) lower frequencies, and passive bass radiators at the back, boosting the bass.

It is worth noting that the Trek Max goes surprisingly loud – louder than I have heard before from a device of this size. That is important if you are outside or in a noisy room – but please do not annoy others too much!

The Trek Max  A34 replaces the Trek A33. What is the difference? Primarily, NFC Bluetooth pairing, pause, resume, forward and back buttons (they work fine), and better sync with iOS devices: on these, the volume control on the Apple device directly controls the volume on the Trek, whereas on other devices the volume controls are independent.

Conclusion: a great little device, and make sure you hear it before dismissing it as too pricey for something of this size.

Specifications

Weight: 1.25 Kg
Size: 24.1 x 9.8 x 5cm
Power output: 15w total
Bluetooth: 2.1 + EDR, A2DP, HFP, HSP, AVRCP
Battery life: 8 hours

Arcam’s high-end Solo soundbar: fixing TV sound

Arcam launched its Solo soundbar and subwoofer at a press event in London last week. When this footage was playing I was not thinking about the soundbar at the foot of the video screen, nor of the subwoofer sitting in the corner. Rather, I was thinking how wonderfully the great B.B. King is playing on this concert Blu-ray; and that is how it should be when auditioning hi-fi.

image

The Cambridge-based Arcam occupies a distinctive spot among UK audio manufacturers, neither low-budget nor at the silly-expensive end of the market. MD Charlie Brennan told me that the company’s focus is audio engineering: not lifestyle, nor ultra high-end, but products that are affordable and which sound great.

The aluminium-bodied Solo bar seems at first listen to be a good example. It is a solid product in every sense, weighing a hefty 6.4kg and featuring 100w of class D (highly efficient) amplification into 6 speaker drivers, midrange (4″), woofer (4″) and tweeter (1″) for each channel.

image

This is more than just a better audio system for your TV. The Solo bar has four HDMI inputs (with 4K support) and one output, so you can connect your games consoles and video streamer sources. There are also optical and coaxial digital (S/PDIF) inputs, and an analogue input for general purpose use, and an output for a subwoofer.

image

It does not end there. The Solo bar supports aptX (which means high quality for systems that support it) Bluetooth streaming both as player (for your mobile device) and as source (for your wireless headphones).

A setup microphone is included in the box, which accounts for the mic input on the panel. Use of this is optional, but it is often worth running this type of setup routine, by placing the mic at the normal sitting position and having the unit optimise the sound for the room, taking into account the position of the subwoofer if present.

Room effects are huge and often ignored, so it is good to see this. However you cannot fine-tune the results yourself; you either disable it, or enjoy the results the bar comes up with.

There is a controller app for iOS and Android but sadly not for Windows Phone, though all the functions are also accessible through the supplied remote. You can switch between unvarnished stereo, or audio processing for Movie or Concert.

image

The Solo subwoofer has a 300w amplifier and 10″ driver. We heard the system with and without the sub. My brief observation is that while it sounded good without the sub, adding it lifted the sound substantially; it is not so much the added bass that you notice, but greater realism. The sub is also important for those all-important explosions and sound effects in movies and games.

The Solo bar is £800 and the Solo subwoofer £500. That does not seem to me expensive given the quality I heard, but neither is it a casual purchase. There are drawbacks to the soundbar approach, notably two-channel sound rather than surround, but the simplicity of the system more than compensates for many (Brennan said that the soundbar market is one of the few areas of home audio that is growing).

Personally I would recommend getting system with the sub if possible, as they are designed to work together.

You should be able to buy a Solo later this month, November 2014.

This is not a review; that will have to wait for an opportunity to try the system for myself and test it in detail.

More information on Arcam’s site here.