Review: Sony SRS-X9 high-resolution network music player

Sony’s top of the range wireless speaker grabbed my attention because it is not just a Bluetooth and Apple AirPlay speaker, but also the entry-level device in Sony’s push for high resolution audio, billed as better than CD quality. Get all the ducks in line, and you can play DSD (the format of SACD) downloads directly through this device, or high-resolution PCM at up to 32-bit/192kHz. It has the speaker technology to go with it too: sub-woofer for deep bass (within the limitations of a small box), and super tweeters for extended high frequencies up to a rumoured 40kHz, though I cannot find detailed specification from Sony. Note that this is well beyond what humans can hear.

image

In the box you get the wireless speaker, remote, polishing cloth, mains cable, two odd little sticks which, it turns out, are tools for removing the front grille, and a couple of short leaflets in multiple languages.

image

The remote has functions for power, input selection (Network, Bluetooth, USB-A, USB-B or analogue audio in), volume, mute, play/pause and skip.

image

This unit is flexible to the point of confusion. Here are the ways you can play back music:

  • Apple AirPlay: play from iTunes over an wired or wireless network using Apple’s proprietary protocol.
  • Bluetooth from Bluetooth-enabled devices such as smartphones or tablets. Uses A2DP (Advanced Audio Distribution Protocol) for best quality.
  • From a DLNA-compliant music server on your network. Sony’s free Media Go will do, but there are quite a few of these around.
  • Audio in using an old-fashioned 3.5mm jack cable.
  • Direct attached USB storage. I had limited success with this, but did manage to play some FLAC files from a USB stick. It is designed for just a few files.
  • Direct USB connection to a PC or Mac. In this mode the unit is a USB DAC. This is how you get the very best quality.

image

Supported formats are MP3, AAC, WMA, WAV, FLAC, and DSD via USB after firmware update. ALAC (Apple lossless) is not listed, but an Apple lossless file I created played fine from a USB stick, from which I conclude that it supports that too.

So how is the out of box experience? The first thing you notice is that this thing is heavy – 4.6kg. Despite its relatively small size (about 430 x 133 x 125mm) it is not all that portable; I mean, you can move it about if you like, but as well as the weight there is no handle and it should be moved with care; it is also mains-only.

The introductory manual gives you several ways to get started. It covers only wi-fi connection; if you want to use a wired network, Bluetooth or USB connection, you are referred to the online manual here. Otherwise, you are offered instructions for iOS, Android, PC or Mac. I have a Sony Xperia (Android) smartphone so I took that option; possibly a mistake.

I tried to follow the setup guide. I have a Sony Xperia (Android) smartphone. I downloaded the recommended SongPal app and successfully paired the phone with the speaker with NFC (tap to connect). The app prompted me to enter my home wifi password, but I was not successful; it just did not want to connect and kept on prompting me. I got hold of an iPhone, tried SongPal on that and was able to connect. Odd.

Once up and running it was time to play some music. I was able to play direct from the phone (Bluetooth streaming) without any problem. My results with DLNA were mixed. I have Logitech Media Server on the network which supports DLNA. Bizarrely, this usually shows up as a source when using the Android SongPal, but not when using the iOS SongPal. It worked at first, but then I started getting “Playback failed”. I had better luck with Windows Media Player over DLNA, and also Sony’s own Media Go.

That said, even when it is working I don’t much like the DLNA option. There is no search option and if you have a lot of music you do endless scrolling. This seems to be a feature of DLNA rather than the fault of SongPal, and a reason why it will never catch up with iTunes/AirPlay or Sonos.

SongPal also supports various apps such as Tunein (internet radio), Music Unlimited and Deezer. You can also add apps such as Google Play. This is a tad confusing though. Tunein seems to be built-in; you can select a radio station, play, turn off your smartphone and it keeps going. Choose Google Play though and it plays over Bluetooth from your phone; disconnect the phone and the music stops.

image

Since Tunein appears to be baked it, it is a shame that you cannot use the radio from the remote without needing SongPal.

If SongPal is not working for you, or if you have a non-supported phone such as Windows Phone, you can connect over the network. The manual suggests that you do a direct connection to a PC using an Ethernet cable, in which case the unit will likely show up in a web browser on 169.254.1.1. However if you connect the Ethernet cable to a switch (such as a socket on the back of your broadband router) it will show up on whatever IP number is allocated by the router; you can find it by looking at DHCP allocations, a bit tricky. There is also a WPS button for instant connection if your wireless router supports it (mine is disabled for security reasons).

Wireless configuration through a web browser, once you get there, is really easy. You can even set a fixed IP address if you want. However, the browser configuration does NOT give access to all the features of the unit; it is mainly for network configuration. The SongPal app has additional settings, including EQ, a setting called ClearAudio+ which does who knows what, and DSEE HX which is meant to enhance lossy audio files such as MP3. That’s unfortunate; not everyone uses iOS or Android. That said, SongPal is not much fun to use anyway so you are not missing too much.

image

Once the unit was up and running I tried a few other modes. I ran up Apple iTunes and tried AirPlay, which works great, though with the usual AirPlay annoyance of a pause when connecting. When using AirPlay, you can use the pause, next and back buttons on the supplied remote. These don’t work in all modes, another point of confusion.

What about playing high resolution music or DSD? I was excited about this possibility so keen to get it working. I even have some DSD downloads to try. Discovering how was a bit of an adventure. You need to do two things.

First, update the firmware, by connecting over wifi and using the otherwise undocumented update button on top of the unit (check Sony’s site for full instructions). You need at least firmware 2.05.2.01.

Second, find and install the Hi-Res Audio Player for PC or Mac on Sony’s site. Third, get a USB cable (not supplied) and connect it to a PC.

The downloads to get this working are here.

image

I was rewarded with excellent sound quality, though the audio player software is basic. On my DSD downloads I could see, for example, 2.8MHzs DSF indicated, and the configuration offered “DSD Native”, so I believe this thing really is a DSD DAC (though who knows, it may convert to PCM internally).

image

Once connected in this way, you can also set it as the output for other audio software such as Foobar 2000 or iTunes.

The sound

What of the sound though? The SRS-X9 has seven speakers: 1 sub-woofer, two midrange, two tweeters and two super-tweeters. This means you get mono for the lowest frequencies, but that it not really a disadvantage as low frequencies are not directional and you don’t get much stereo image with this box anyway.

In addition, there are two passive bass radiators.

image

As you would expect from a unit at this price (nearly £600 in the UK) and with some audiophile pretensions, the sound is very good. In its class – as a single box wireless speaker – it may be the best I’ve heard. It easily beat a Squeezebox Boom, sounding both bigger and cleaner. I also thought it had the edge over an Audyssey Lower East Side Audio Dock Air, which is another AirPlay speaker with good sound, though the Audyssey offers deeper bass.

The SRS-X9 does go relatively deep though, and the bass is clean whereas the Audyssey tends to boom a little.

The sound is not faultless though. It is a touch bright and can get a little strident at higher volumes. Vocals can have slightly exaggerated sibilance. Stereo imaging, as mentioned above, is poor, thanks to the close proximity of left and right speakers. The sound is exceptionally clean, which is hardly a fault, but worth noting if you like to get down and boogie; you might find the SRS-09 overly clinical.

These are reasons why the SRS-09 will not replace a traditional home stereo for me. I also like having separate speakers either side of my PC screen, so this is not perfect for that role.

HOWEVER as a minimalist and good-looking single box speaker this is excellent; perfect for a sitting room if you do not want the clutter of a traditional home stereo, or for somewhere else round the house where you want high quality music.

The sound over USB is best, and ideally I would suggest parking a Mac Mini or similar small computer next to it and using it that way. On the other hand, AirPlay also works well and in conjunction with Apple’s Remote app this is a convenient solution. Bluetooth can be handy too.

A few other notes. Sony has gone for an understated design, and the buttons on top of the unit are completely flat and in fact mostly invisible unless you hover your hand close by – it uses a proximity sensor. Clever, but easy to hit a button by accident if you are repositioning the device.

The appearance is glossy black, looks nice but gets dusty easily. Sony supplies a little black cloth for polishing. Unfortunately the super tweeters on top are surrounded with a slightly sticky area which attracts dust and is hard to clean; this might bother you if you are meticulous about such things.

The front grille can be removed with two supplied magnetic tools; Sony says this give a “more dynamic sound” though the difference is not great.

image

It is a shame that there is no audio output port, neither for headphones, nor for external speakers. You cannot use this as a DAC for another stereo system, for example.

An S/PDIF optical digital input would also be handy, as this is more universally compatible than USB for wired digital input.

Other weak points are the fiddly setup, reliance on a mobile app for some settings, general unreliability of DLNA, and some problems which mysteriously disappear when you turn off and on again (with so many input options it is not surprising that the Sony gets confused sometimes).

Conclusion? There is a ton of technology packed into this box and it does sound good. I like the option to play back native DSD even though it is all a bit mad; it is doubtful that the inaudible higher frequencies really make any difference, and there are compromises elsewhere such as the mono sub-woofer and limited stereo image that more than outweigh any benefit from high-resolution (a controversial subject). Never mind though; Sony has taken trouble over the sound and it shows.

Good points

  • Flexible streaming options
  • High quality sound, exceptionally clean
  • Compact, minimalist design
  • Smooth AirPlay support
  • Support for hi-res PCM and DSD audio files when connected via USB

Bad points

  • Dependence on iOS or Android apps for some features, no support for Windows Phone
  • No headphone socket
  • No audio output for connection to other hi-fi kit
  • No S/PDIF optical digital input
  • Limited stereo image and sound too bright on some material

Specifications

  • Size: 430x133x125mm
  • Weight: 4.6Kg
  • Power consumption: 50w
  • Power output: unknown though Amazon quotes “154w”
  • Frequency response: Sony quotes “45Hz to 40kHz”.
  • Drive units: 1 sub-woofer, 2 passive bass radiators, 2 midrange units, 2 tweeters, 2 super-tweeters
  • Streaming support: Bluetooth audio, AirPlay, DLNA

Review: Power Cover for Microsoft Surface tablets

I took advantage of a recent US trip to purchase a Surface Power Cover, at the Microsoft Store in Bellevue, near Seattle.

The concept is simple: you get an external battery integrated into a Surface keyboard cover. The keyboard is similar to the second version of the Type Cover, though curiously without backlighting other than a caps lock indicator. The keys are mechanical which for most people means you can type faster than on the alternative Touch cover, though it is less elegant when considered as a cover rather than as a keyboard.

image

The trackpad is the same on all three second edition covers, which is to say, not good. The problem is not the trackpad itself, but the mouse buttons, which are NOT mechanical keys (they were on the first edition Type Cove). Given that you need to press and hold a mouse key for some operations, having a physical click on the trackpad buttons is particularly useful and much missed. Another annoyance is that you cannot disable tap to click, which means some mis-clicks are inevitable, though on the flip side it is easier to tap to click than to use the fiddly mouse buttons.

Having said that it is the same, I have noticed that the trackpad on the Power Cover seems a bit smoother and better behaved than the one on the Type Cover 2. This could be sample variation, or that it is new, or that Microsoft has slightly tweaked the internal design.

As you would expect, the Power Cover is heavier and more substantial than the Type Cover, though I find you notice the weight more than the bulk. Even with the Power Cover, it is still smaller and neater than a laptop. The extra rigidity is a benefit in some scenarios, such as when the keyboard protrudes over the edge of a table. The fabric hinge, which is a weak point in the design of all the Surface covers, seems to be the same on the Power Cover and I fear this may cause problems as the device wears, since the extra weight will put more strain on this hinge.

As with the other keyboard covers, if you fold it back under the tablet, the keys are disabled. In this mode the Power Cover is purely an external battery.

I used the cover with the original Surface Pro (it is compatible with all the models other than the original Surface RT). I understand that a firmware update is needed for the power cover to work; if so, it installed seamlessly though I did need to restart after connecting the keyboard for the first time. Everything worked as expected. If you click the battery icon in the notification area you can see the status of both batteries and which is charging, if you are plugged in; generally one one charges at a time.

image

I boarded my flight and noticed that the Surface is smart enough to use the external battery first, and then the internal, presumably on the basis that you might want to remove the keyboard and use the Surface in pure tablet mode.

image

It is impossible to be precise about how much extra time you get from the Power Cover, since it depends how you use the machine. It is a big benefit on the original Surface Pro which has rather poor battery life; extended battery life is perhaps the biggest real-world difference between the Surface Pro and the Surface Pro 2. Subjectively I have doubled the battery life on my year-old Surface Pro, which for me makes the difference between running out of battery fairly often, and hardly ever.

The Power Cover costs $199, which is expensive considering that you can get an entire spare Android tablet or Amazon Kindle Fire for less; but put in the context of the equally over-priced Type Cover, which costs $129, you can argue that it is not that much extra to pay. Prices from third-party sites will likely be lower once availability improves.

If you need it, you need it; and this must be the best way to extend the battery life of a Surface tablet.

The Surface keyboard covers are not perfect, and I still sometimes see an annoying fault where the mouse pointer or keys stop responding and you have to jiggle the connection or tap the screen a few times to get it back (I am sure this is a driver issue rather than a poor physical connection). Still, I put up with a few irritations because the Surface gives me full Windows in a more convenient and portable form factor than a laptop, and there is more right than wrong with the overall design.

Summary:

  • If you already have a keyboard and your Surface lasts as long as you need – forget it.
  • If you have a Surface that runs out of power with annoying frequency (probably a Surface Pro 1), this is worth it despite the high price.
  • If you don’t have a keyboard (for example, you are buying a new Surface) then this is worth the extra cost over the Type keyboard.

Hope for Squeezebox as Raspberry Pi becomes a streaming player

Now that Logitech has near-abandoned the Squeezebox (the one remaining player is the UE Smart Radio, and even that is not quite a Squeezebox client unless you download different firmware), existing users may be concerned for the future of the system.

Squeezebox consists of free server software which runs on a PC or NAS (Network Attached Storage) device, while the players are supplied by Logitech and controlled by a web app or smartphone/tablet app. Although more fiddly to set up than rivals like Sonos, Squeezebox is a strong choice for multi-room audio at a modest choice, and its community has come up with solutions such as support for high-resolution audio.

The latest community innovation is a project to make a Raspberry Pi into a Squeezebox client. piCorePlayer is delivered as an image file which you can write to an SD card. Pop the card into a Raspberry Pi, supply power, and it is ready to go – meaning that you need no longer worry about getting hold of a Squeezebox player.

image

The OS is the MicroCore version of Tiny Core Linux, and the player is Triode’s Squeezelite.

I gave this a try. It was almost very easy: my Pi booted successfully from the piCorePlayer image and was immediately recognised by my Logitech Media Server. The player supports output to the built-in audio jack, or HDMI, or a USB DAC, or an add-on DAC for the Raspberry Pi called HifiBerry.

I am using a USB DAC (Teac UD-H01) which requires a little extra configuration. I logged in to the piCorePlayer using Putty, and typed picoreplayer to display the configuration menu:

image

Configuring a USB DAC is a matter of getting a list of available ALSA devices and setting the output accordingly.
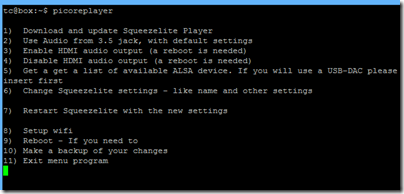
It worked, but oddly I found that FLAC in 16/44.1 format played with crackling and distortion. 24-bit files played perfectly.

image

The only solution I have found (though it sounds counter-intuitive) is to force output to 16-bit by adding –a 40::16 to the Squeezelite arguments. Everything now plays nicely, though limited to 16-bit – you are unlikely to notice much difference but it is a compromise.

If you try piCorePlayer, here are a few tips.

Log in with user: tc pwd: nosoup4u

The Squeezelite executable is stored at:

/mnt/mmcblk0p2/tce

and the settings scripts are in

/usr/local/sbin/settings_menu.sh

If you need to edit the configuration without the script, you can use vi, which is the only pre-installed editor I have found. Quick start with vi:

  • Type i to enter edit mode
  • Press ESC to enter command mode
  • Quit without saving by typing :q!
  • Save and quit by typing :wq

There are plenty of vi tutorials out there if you need to know more!

Finally, note that this version of Linux runs in RAM. If you make changes they will not persist unless you create a “backup” with

/usr/bin/filetool.sh –b

This is also an option in the picoreplayer menu, and must be used if you want your changes to survive.

Review: Om Audio INEARPEACE ear buds. Superb sound

Ear buds are massively popular, but most do not sound that good. Tinny bass and splashy treble is nothing unusual. They can sound good though. At CES I heard a couple of true high-end in-ear headsets, Shure’s SE 846 ($999) and Audiofly’s AF180 ($549); I especially liked the AF180 and wrote about it here.

image

But how about Om’s INEARPEACE at a mere $149? No, they are not the equal of the AF180s, but at one third the price they are delightful, musical, smooth, clear and with actual bass.

Om Audio is a company with some personality – “listening to music should be a sacred experience,” says the website, and that is reflected in the packaging, with the ear buds embedded in the side of a foam inner container.

image

You get a set of ear buds with an inline controller and microphone for a smartphone, a smart zipped bag, and a packet of ear tips in various sizes.

image

The ear buds themselves have a distinctive design, with a cylindrical body. The cable is flat and supposedly hard to tangle.

image

Within each ear bud are two drivers, a balanced armature driver for treble and mid-range, and a 10mm coiled driver for bass.

The INEARPEACE ear buds are aimed at those in search of better audio quality than the average in-ear headset, and they deliver. Listen to these and you will not want to go back to the set that came free with your phone. There is adequate treble, but no sign of the shrillness that characterises so many ear buds. The bass is not overpowering, but it is clean and reasonably extended, making music more balanced, rhythmic and enjoyable.

I am not going to get too carried away; these are not the last word in sound quality. There are others to consider in the price range $75 – $150. These are more than decent though, and their musical sound and elegant construction wins them a recommendation.

Review: Audio-Technica SonicFuel ATH-CKX5iS ear buds

At CES Audio-Technica showed off its new range of ear buds, sorry “in-ear headphones”, including this budget SonicFuel ATH-CKX5iS model, at a recommended price of $49.95 and including an in-line mic, answer button and volume control for use with smartphones. While towards the low-end, it is by no means the cheapest in the Audio-Technica range, which starts at just $14.95 for the ATH-CLR100.

The distinctive feature of the SonicFuel range is the C-tip earpieces which have a short curved arm that fits snugly in the ear. The ear tips also rotate so that they angle themselves to the shape of your ear. The result is an exceptionally snug fit, and ear buds that are less likely to fall out when you are on the go. Three sizes of C-tips and four sizes of ear tips are supplied. It does pay to take some time selecting the right size, and journalists attending CES were fortunate to have assistance from an expert fitter.

image

The truth is that the sound you hear from ear buds does vary substantially according to how snugly they fit, and while not everyone can get a personal fitting at CES, it is essential to fit them correctly to get the best results. Fitting the tips to the ear buds is slightly fiddly, but you only have to do this once.

image

The in-line controller has a sliding volume control (a mixed blessing as you can accidentally slide it down and wonder where the volume has gone), a microphone and an answer button.

image

The headset is supplied with a handy bag for your headset and the spare gels.

image

So how do they sound? The biggest problem is that bass is lacking and the sound overall is thin. Slight sibilance can be annoying on some material. Tonally they are bright rather than warm, though not unpleasantly so. The best thing I can say is that they are inoffensive.

The specifications show an amazing frequency response of 15-22,000 Hz which is hard to reconcile with the puny bass, but since no +/- dB range is shown I guess this does not mean much.

Summary: I love the C-tips and the snug, strong fit; but the sound is a let-down. Possibly going a little further up the SonifFuel range would be worthwhile, though these are the only ones I have heard.

Review: Turtle Beach z300 headset. Super flexible, shame about the sound

The Turtle Beach Z300 is a super flexible gaming headset, with wired and wireless connections, Dolby 7.1 virtual surround sound, and extra features like switchable dynamic range compression. It is primarily for PC gaming, but also works with Mac (no Dolby surround) and with any Bluetooth-compatible device – which means almost any smartphone or tablet. You can also use the wire to plug it into any device with a 3.5mm audio jack.

image

In the box you get the headset, detachable microphone, USB cable, jack cable, USB transceiver, and some documents including a note about having to download the Dolby 7.1 drivers. I still recommend downloading the online manual, which is more detailed than anything in the box.

image

A few more details on the three ways to connect:

Wireless via a USB transceiver. This is the preferred method for a PC. The USB transceiver is pre-paired and indicates via an LED whether or not the headset is connected.

Traditional wire. A jack cable is supplied which connects to the left earcup and has a standard four-way 3.5mm jack on the other end, suitable for a phone or tablet. In wired mode you still need to charge the headset and have it powered on.

Bluetooth. You can pair with up to two devices. The right earcup has Bluetooth volume controls, and a Bluetooth button for answering, rejecting and ending calls.

The actual headset seems sturdily made and features a fabric-covered headband and earpads. The material feels slightly coarse at first, and the earcups are slightly on the small side, but in practice I found the comfort reasonable.

The microphone is on a flexible boom and is detachable. You can also swing it up above the left earcup to get it out of the way.

You charge the Z300 via a mini USB port on the right earcup, which annoyingly is the old type, not the slightly smaller one now found on most phones and tablets. A cable is supplied, though it is too short to reach from the floor to your headset if you are wearing it, and in my case too short even to reach from the front panel of my PC. You might want to get a longer cable if you expect to charge while wearing. Play time is specified at 15 hours.

An annoyance: there is no indication of remaining charge.

How about the other controls? There are several:

Power on/off on the left earcup and easy to find by feel. The headset automatically powers off after 5 minutes of inactivity.

Master volume on left earcup.

Mic monitor volume on left earcup. This controls how much sound from the mic is fed back to your. It does not affect the volume heard on the other side.

Tone on left earcup: cycles through 4 “game modes”. These are Flat, Bass boost, Treble boost, and Bass and Treble boost. I generally used the Flat mode for this review.

Dynamic Range Compression on left earcup: raises the volume of quiet sounds. The effect seems minimal to me.

Bluetooth controls on right earcup: as mentioned above.

If you use the USB transceiver and a Windows PC you can insteall a Dolby 7.1 driver. Note: these are stereo headphones, but when used with this driver they support Dolby’s virtual surround system. You enable this by going into the Windows sound properties dialog (eg right-click the speaker icon and choose Playback Devices), then showing the properties dialog for the Turtle Beach speakers. A surround sound tab then lets you enable “Dolby Headphone”. You can also choose between two modes: Music or Movie.

image

Enabling Dolby Headphone makes a substantial difference to the sound. It is distinctly louder, and the sound seems to fill out more. On games with true surround sound, the virtual sound should mean that you get spatial clues about the source of an explosion or footstep, for example, though you need to make sure the game is set to output in surround sound.

I tried this and reckon it works a bit. It is not as good as a headset I tried that really did have multiple speakers. My big gripe though is that if you enable Dolby Headphone, it messes up true stereo, for example on music. You no longer hear the mix as intended.

This would not matter too much if it were easy to switch Dolby Headphone on and off, but it is a hassle to go into Windows sound controls every time. I would like to see more effort go into usability.

How about the sound quality? Here is my second big gripe about this headset. The sound is not great, with anaemic bass and a nothing special in the mid-range or treble. For gaming it is not too bad, and I did find the audio atmospheric if you can live without much bass thunder, but for music they are not good enough.

The microphone quality is fine. I tried the headset with Dragon Dictate, just to check the quality, and got high accuracy of transcription which is a good sign.

In summary, the flexibility is exceptional, the build quality is fine, but the sound is lacking. Personally I would not use these as my main headset because I do both gaming and music listening; but if your main use is gaming they would be OK.

Price is around $170 or £170 (better value in the USA it seems).

Naim’s Statement: no compromise home audio

I was fortunate to hear Naim’s Statement amplifier, currently a prototype subject to final tuning before release in July, at the CES exhibition in Las Vegas.

image

Statement is actually two amplifiers, the NAC S1 pre-amplifer and the NAP S1 mono power amplifiers. In the above picture you can see them standing together as three large vertical boxes, the slimmer pre-amp and the power amps on either side. Each amplifier is also divided horizontally, with the power supply below and the amplifier electronics above.

image

I do not have confirmation of the price but believe it will be around £150,000 for a set.

My quick comment is this. The sound is huge and has the qualities Naim aficionados love: muscular, etched, authoritative. Naim is often considered to have a house sound dating back to its earliest electronics in the eighties, and the Statement continues that tradition.

I did not think the sound was flawless though. Rhythm and percussion was stunning, but whether it is the most natural sound I am not so sure. Can Statement do sweet and delicate? Bear in mind though that I only had a short listen and that some fine-tuning remains.

Naim says the sound is without compromise, and Statement will only appeal to those who are not only wealthy, but share that attitude, building their living space, or at least their music listening space, around the electronics, rather than having it blend into the furniture Bang & Olufsen style.

Review: Innergie PocketCell pocket battery charger: elegant design though limited capacity

Smartphone battery life has marched backwards, or so it seems: my ancient HTC Desire still lasts longer on a full charge than my newer Nokia Lumia 620 or Sony Xperia T. Another problem is tablets: battery life is decent compared to a laptop, but it is easy to get caught towards the end of the day or on a plane with an exhausted battery.

The solution, if you cannot get to a charger, is one of those pocket chargers for topping up your device. These are popular promotional giveaways, which means I have a drawer full of them (or would if I had kept them); but many are rubbish: bulky, fiddly with lots of assorted adapters to cope with different phones, and some with pointless adornments like solar panels.

I make a partial exception for a PowerTrip charger I received recently, which has an impressive 5700mAh battery, but it is still ugly, comes with three cables, and has silly extras like a solar panel and ability to work as a memory stick.

By contrast, the Innergie PocketCell is the first charger I have seen which has immediately impressed me with its design.

image

There are only two pieces you need to carry with you, the small battery pack itself and a clever three-in-one cable in which the adapters snap together, so you can charge a device with Mini-B or Micro-B USB (the two popular types), or an Apple 30-pin dock connector (if you have an iPhone 5 or another device with the new Lightning Connector you are out of luck unless you have an adaptor).

image

The same connector also serves to charge the PocketCell, using one of the many USB mains chargers you almost certainly already possess, or by plugging into a PC or Mac. The PocketCell has a USB Type A socket for output, and a Micro-B for input, so you cannot easily get it wrong.

On the side of the PocketCell is a button which you press to discover the current charge. It lights up to four LEDs, to indicate the level of charge remaining.

Battery capacity is 3000 mAh; not as good as a PowerTrip, but decent considering that it is less than one-third the size and much lighter (72g/ 2.5oz).

I tried the PowerCell on an iPhone 4 with a fully expired battery (at least, expired to the point where it would not switch on).

image

The phone charged successfully, during which time the PocketCell got somewhat warm, but with impressive speed of charge. After the charge the PocketCell was pretty much exhausted.

The PocketCell supports 2.1 amp fast charge, which means it is fine for charging an iPad or other tablets with USB power.

The small size, nice design, and effective charging of the Innergie PocketCell means this device might actually find its way into your bag. The downside is that it is more expensive (especially in the UK) than some other portable chargers with equal or greater capacity, but its elegance and usability is worth a bit extra.

While I recommend the device, check that 3000 mAh is sufficient for you before purchase. I have also heard that the three in one cable is a little delicate, though you can get replacements if necessary or use a standard USB cable.


Expanding the Raspberry Pi with PiFace and Pi Rack

The marvellous Raspberry Pi, essentially a cheap, small PC, is a great device for education or home projects like media streaming. Out of the box though, it is not ideal for controlling other devices other than by USB or ethernet. What if you wanted to to use it to operate a switch under program control? You can use the GPIO (General Purpose IO) header, but it is a considerable step up in terms of the electronics knowledge needed for success (and to avoid damaging your Pi).

Element14 has an answer to this in the form of the PiFace, which connects to the GPIO header and provides a range of inputs and outputs. To be precise:

  • 2 changeover relays. These switch a link between a central common pin and two other pins.
  • 8 open-collector outputs. You can use these as switches for an externally powered device.
  • 8 digital inputs. These detect whether a contact is open or closed.
  • 4 switches. These close the first four inputs when depressed.

Element14 kindly supplied a PiFace to me for review, along with another accessory, the Pi Rack, of which more in a moment.

The PiFace comes in a small cardboard box with a regulatory compliance leaflet and no other documentation.

image

Here is a closer view:

image

You can see the inputs at bottom left, the outputs at top right, and the relays on the right. The following diagram from the Element14 site shows the details:

image

The PiFace fits on top of the Raspberry Pi. A rubber foot on the underside rests on the HDMI port relieving the strain on the GPIO connector. If you have a standard size Raspberry Pi case, it will no longer fit once the PiFace is attached, though you can still use the base of the case as I did for my tests. Note that by default the PiFace takes power from the Pi, though this has implications for the power supply you use, which must be 850-1400 mA for the model B Pi.

image

On the software side, installation is either by downloading a pre-built Raspbian image with the software already in place, or by modifying your existing installation. I am using the soft-float Debian Wheezy build and chose the latter route. It is not difficult; just enable the SPI (Serial Peripheral Interface) driver by removing it from the modprobe blacklist, run an install script, and reboot. The scripts come from a github repository here.

The PiFace software includes a nice emulator which lets you operate the switches. I am not sure that emulator is quite the right description because it really does operate the switches.

image

Being more of a software person than an electronics engineer, I set myself a simple task: to operate a light switch under program control. I used a child’s electronics kit to provide the light. First I tried using the relay, which was very simple: it is just a switch. Next I used one of the open-collector outputs which also worked once I had found out that the negative connection from my external 3V power supply connects to GND on the PiFace. Here is my light in action:

image

Note the LED is lit on the output terminal indicating that the switch is ON. Rather than the external supply, I could have taken 5v from the PiFace. A very simple test, but if you can switch a bulb on and off you can switch any number of other things as well, provided the voltage is not too great. Above 5v requires changing some jumper settings and even the relays should not be used for voltages over 20v or currents greater than 5A.

What about programmatic control? Libraries are supplied for Python, C and Scratch (a visual programming language primarily for education). I adapted the example Python script as follows:

from time import sleep
import piface.pfio as pfio
pfio.init()

while (not pfio.digital_read(1)):
if (pfio.digital_read(0)):
  pfio.digital_write(2,1)
else:
  pfio.digital_write(2,0)
sleep(1)

print "Bye"

This script loops until you depress (or otherwise close) the second physical switch or input on the PiFace. It reads the value of the first input, and if it is ON it turns on the output which lights the bulb. Rather pointless, but shows how easy it is to turn a physical device on and off under program control, and to respond to the value on an input.

I like the PiFace though it is in competition with the slightly more expensive Gertboard which has a motor controller, Digital to analogue and analogue to digital converters, and an on-board programmable MCU (Microcontroller). You might not need those features though, making PiFace a better choice.

A snag with the PiFace is that it uses the GPIO port and therefore prevents you using that port for anything else. In order to fix this and to increase the expandability of the Raspberry Pi, Element14 also supply the Pi Rack. This is a simple affair that give you four connections to the GPIO port. You can use this to operate more than one PiFace (each must have a different jumper-set address) or to use other GPIO devices such as the Pi Camera Module. The Pi Rack has its own 5v power input though no power supply comes in the box. Jumpers let you select which power supply to use on a connector-by-connector basis, and to swap the SPI CE (chip enable) lines if needed.

image

Here is the Pi Rack in use with a PiFace. In practice you would want additional support for the PiFace rather than just relying on the connector.

image

Currently the PiFace Digital is £20.30 and the Pi Rack £6.99.

DTS Headphone X surround sound from stereo is astonishing though Z+ music app disappoints

I first heard the DTS surround sound from stereo demo at this year’s Mobile World Congress in Barcelona. The technology is called Headphone X. It was astonishing. You went into the Qualcomm Snapdragon 800 theatre – it was in association with Qualcomm become some DTS technology is baked into the latest Snapdragon chipset – sat in a plush armchair, and donned stereo headphones.

image

The next thing you knew, sound was coming from front left. Then front right. Then rear left. The illusion was amazing, and I was not the only one who removed their headphones temporarily to check that they really were the sole source of the sound.

I interviewed the DTS folk about the technology, and also spoke to the guys at Dolby. Nothing new, said the Dolby folk, we’ve had virtual surround sound for years. Yet, the demo at the Dolby stand fell far short of what DTS was showing.

Now you can try it, if you have an Android or iOS device. Download the Z+ app and listen to the demo.

image

I tried this on someone today, and his “Wow!” reaction showed that the demo is still astonishing. You know it is an illusion, but it sounds as if you are seated in the middle of a room with five or more speakers.

If DTS has proved that surround sound from stereo is possible, what are the implications? Surround sound has not failed exactly, but its inconvenience has limited take-up. Many surround mixes of music albums are now hard to find, because they were made for long out of print SACD or DVD-Audio releases. What if you could easily download all these mixes and enjoy them with stereo headphones or earbuds?

An enticing thought, but there are caveats. The Z+ app, for example, is disappointing once you get beyond the demo. The only album it plays is the Hans Zimmer soundtrack to the Superman film, Man of Steel. One track is included for free, and the others are in-app purchases. It sounds good, but the surround effect is less convincing than it is in the demo. I heard better music demos in Barcelona. I also get superior sound on the iPhone than on the iPad (it is an iPhone app), though I might be imagining it, and in both cases I get occasional stuttering, though that may be because I am not testing on the latest generation Apple hardware.

image

An app that only plays one album is not a revolution in sound, and if this is to go mainstream, DTS needs to sell its technology to one of the major music download or streaming services and have it built-in to the client app. It has made a start, with its Qualcomm deal which is meant to be in shipping chipsets from “the second half of 2013” according to the information in Barcelona. My guess is that any problems with stuttering will be removed when there is hardware support.

How does it work? The DTS guys told that it “it’s psychoacoustics. You’re triggering the brain with responses that induce it to say, this is from here. It’s a combination of timing and frequency. That’s traditional virtualisation.” After that, they explained, they apply room acoustics that take the illusion to another level. This could be the room acoustic of the studio, achieving a holy grail for audio engineers, or that of the listener’s own room or a concert hall, for example. The room acoustic can be user-selectable, though this is not a feature of the current Z+ app.

There is a caveat that might upset hi-fi enthusiasts. Think about it. Virtual surround sound is delivered in stereo, which seems impossible, but then again we only have two ears. Our ears are designed to hear sounds more clearly if they are in front of us. Therefore, to simulate a sound coming from behind you, do you need to make it less clear?

I put this point to a guy from DTS, that parts of the music are in a sense deliberately distorted or muffled. “That occurs naturally by our head,” I was told. So is the fidelity of the sound reduced in order to achieve the surround illusion? “No differently than speakers in a surround system would do anyway,” he said.

Another caveat is that, by design, the system only works with headphones. Of course, if you have a full surround system in your room, you can play surround mixes in the normal way, turning to the DTS technology only for headphone listening. Headphones are also unable to recreate the effect of a sub-woofer which you can feel in your chest. “It’s a physical element. We’re not going to be able to replicate it,” said DTS.

Headphones are unbeatable though if you want to recreate the acoustic of a different room, such as the studio where the music was mixed. Further, for a mass market, delivering surround sound through a mobile device and standard earphones is the right approach.

The Z+ app is disappointing, but I would nevertheless encourage anyone with an interest in audio technology to download it and try the demo. Headphone X has huge potential and I shall follow its progress with interest.

Tech Writing